Exploring Practitioners 1: Key Making – Loke Ting Wei
Creative Practice:
The key maker duplicate keys for her customers by using a key machine and other tools.
Key Making Process Documentation:
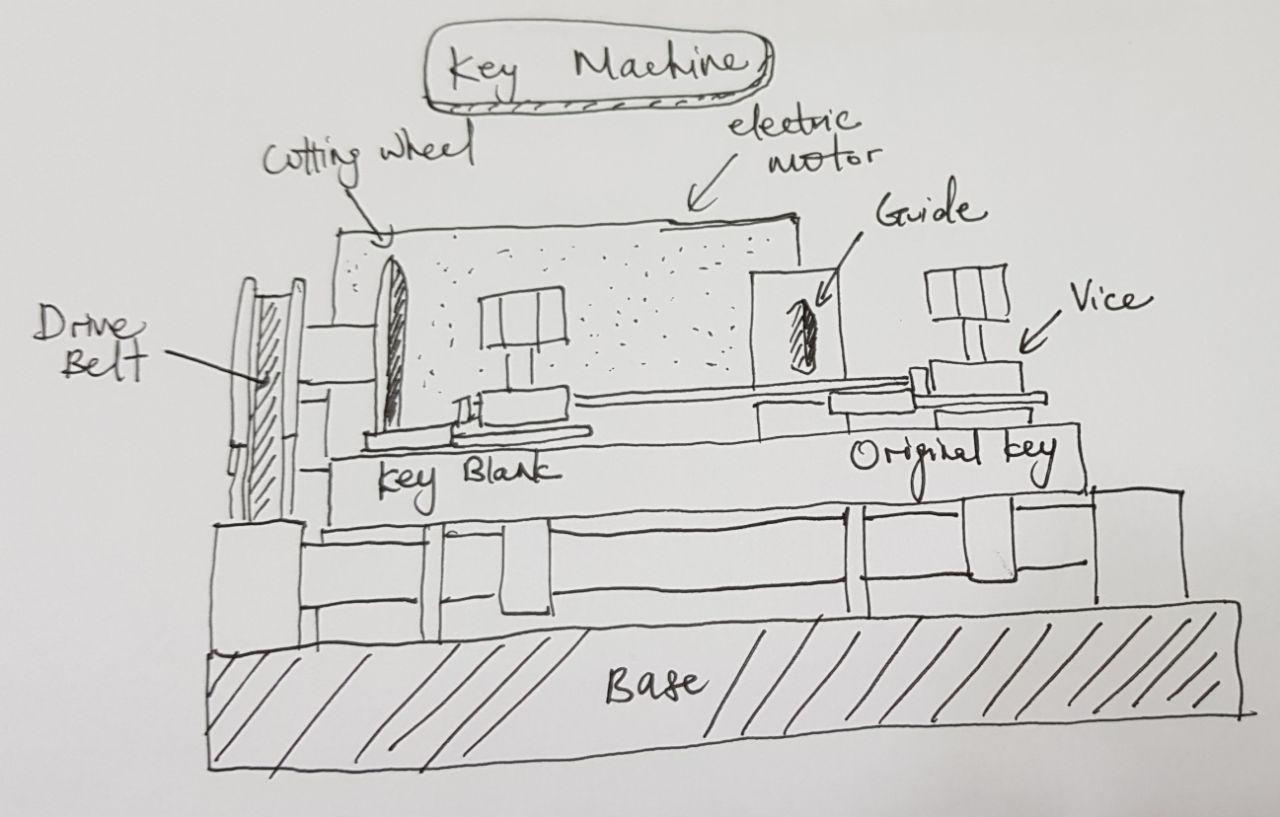
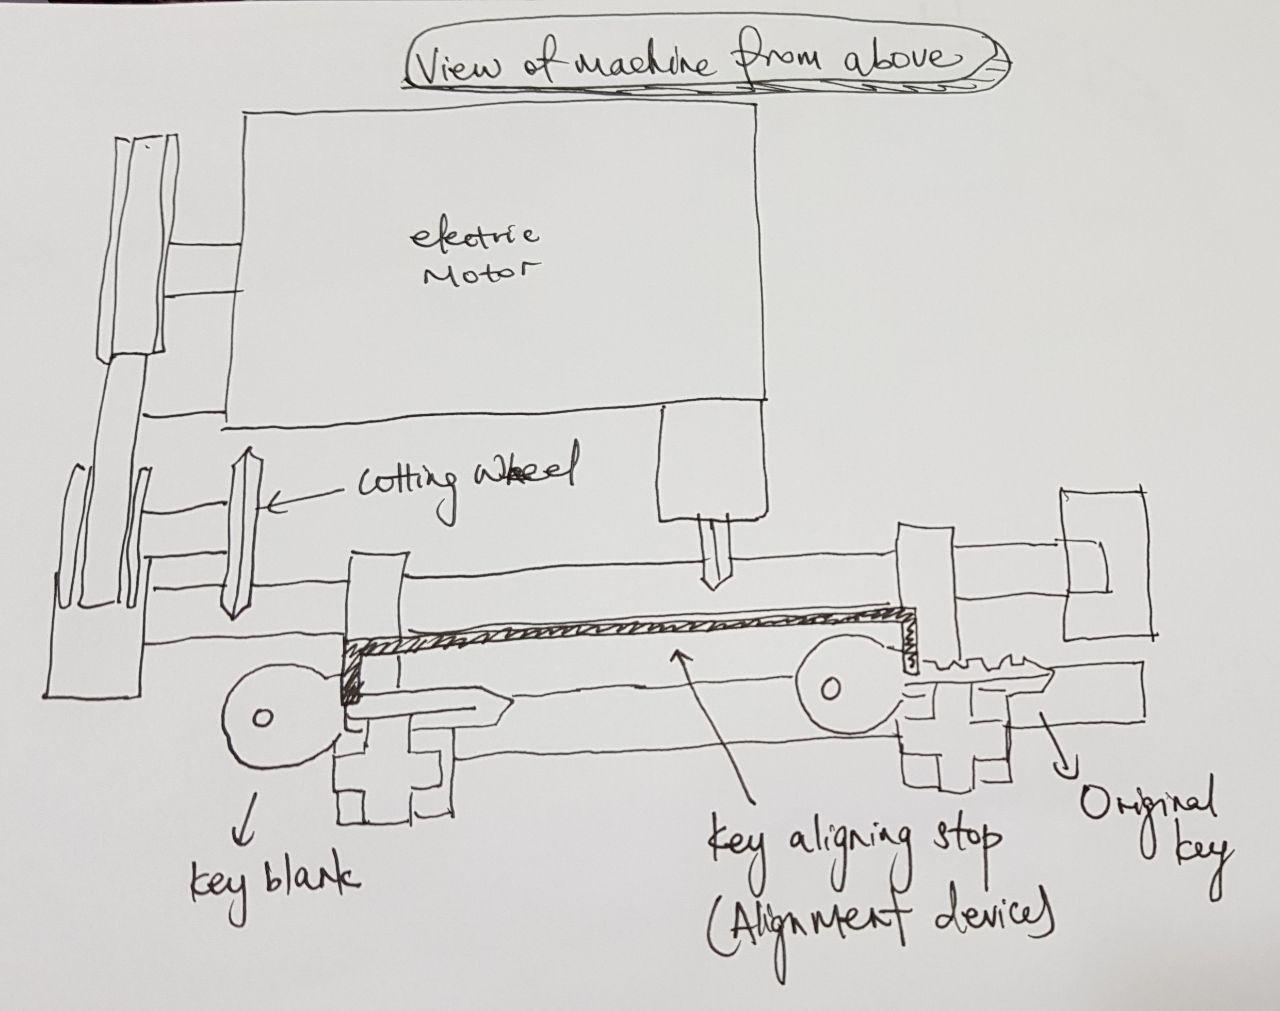
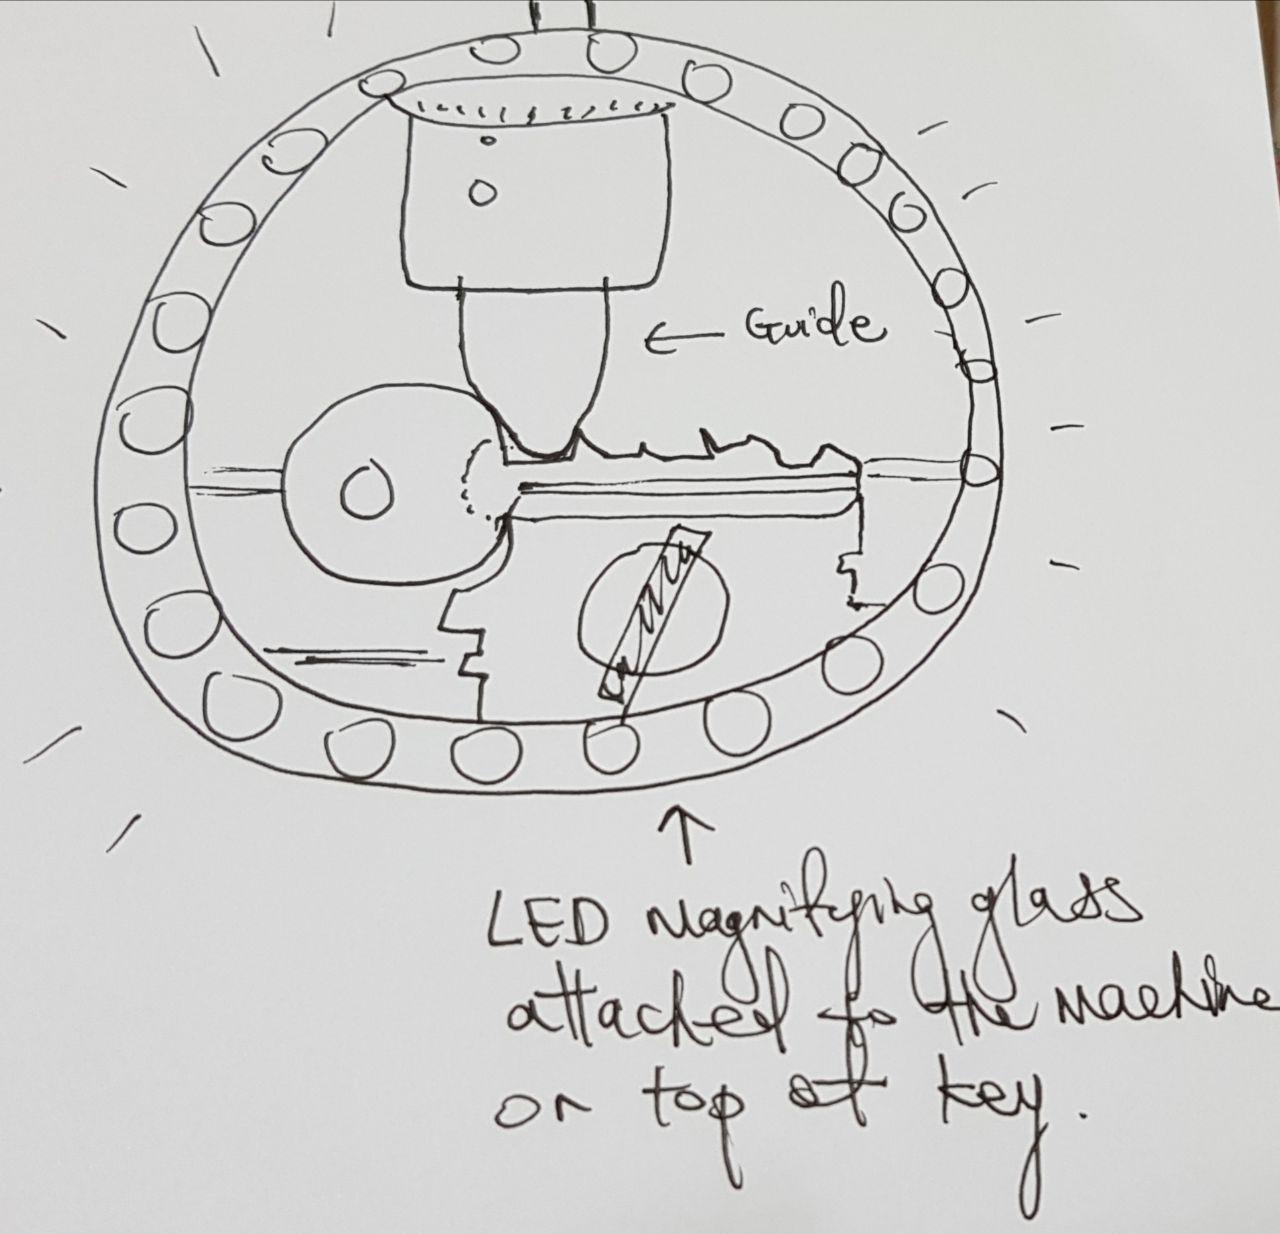
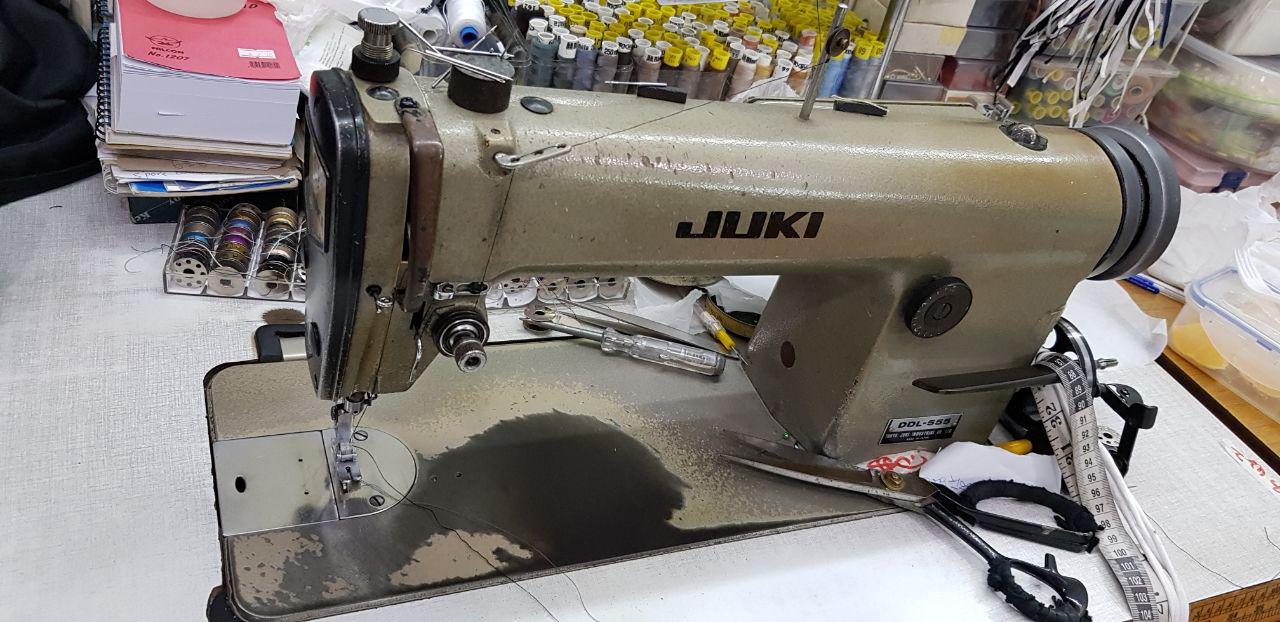
Parts of a key machine:
- An electric motor to turn the cutting wheel
- A cutting wheel
- A vice to hold the key blank
- A vice to hold the original key
- A guide
- A key alignment device
After observing and understanding from the key maker, I learnt about how key machines work. The key machine is used to duplicate a key, where an original key is inserted into the vice that is near the guide and a key blank is inserted in the vice near the cutting wheel. The alignment device, which is two bars connected, is used to make sure the original key and key blank always remain the same distance apart. The keys are horizontally aligned in the vices to be fixed in the same place in relation to the cutting wheel and guide. When the machine is on, the motor spins the cutting wheel. Then, the key maker will trace the guide along the cuts of the original key. The key blank will be dragged along the cutting wheel, duplicating the cuts on the original. When all the cuts are made, the process is finished.
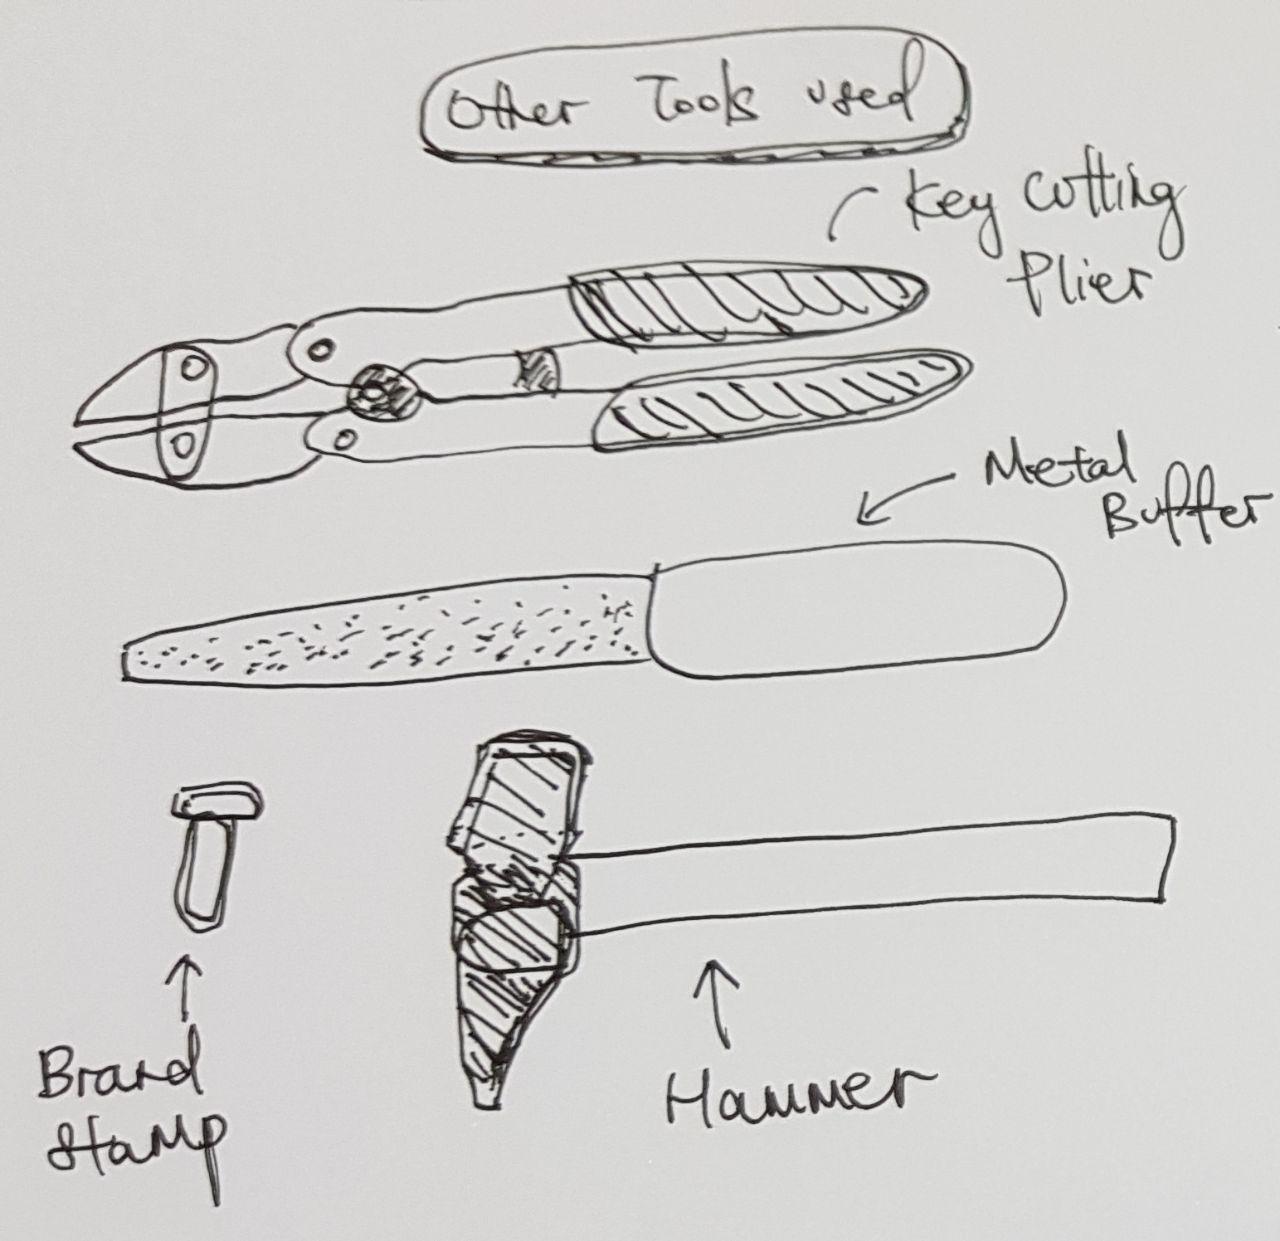
After the key is cut, the key maker cuts off the excess part of the key if it is too long with a key cutting plier. Then, she removes the burrs by buffing the key with a manual metal handheld buffer. Finally, the brand of the key is imprinted onto the key by knocking into the metal with a hammer.
Workplace Documentation:
The workstation is small, but sufficient for the skilled key maker. With the small surface area, she had ample space to complete her key making process. A small table is used, with the key machine and the essential tools beside it.
Tools:
Original key
Key blank
Key machine
Key cutting plier
Metal buffer
Brand stamp
Hammer
Pain Points and Design Ideas:
I observed that the key maker buffed the key with a physical metal buff, unlike more modern machines which has a rotary wire brush attached onto the key machine itself, powered by the motor. As such, the physical metal buff would require more effort, and may result in less evenness and smoothness of the key. Hence, upgrading the machine to one with an attached rotary wire brush would be good.
I also realise that the key maker kept looking at the guide and the original key to make sure that the key blank is cut properly. She is an elderly auntie who wears glasses; and the daily activity of scrutinising at the key would be tiring for her eyes. Furthermore, I realise that the lighting of the shop is not particularly bright. Hence, I would suggest building a magnifying glass, with led lights at the rim of it, above the original key and guide so as to provide her a better view of it. With that, it would be less straining for her eyes.
I also understand that the cutting wheel would become smaller and thicker over time, leading to less accurate key duplicates. Hence, the key maker would need to change the cutting wheel when that happens.
Other than that, I learnt that the accuracy of the key duplicate also depends on the quality of the original key itself. If the original key is already worn, then the duplicate itself would not be accurate. Copies of copies also would not work well. Hence, my suggestion would be to improve the process from the key user’s side. The solution would be to duplicate the original key with a reliable key maker when it is new. With that, even if it is worn, there would still be a form of the original key existing for reference. Another solution would be to create a “duplicate” the key with a 3D printing machine, which can print metal. That would be the future to key making.
Exploring Practitioners 2: Tailoring – Loke Ting Wei
Creative Practice: I approached a tailor near my house who makes and alters clothes. When I approached her, she was altering a skirt for a customer who wants it to be shorter by half an inch.
Tailoring Process Documentation:
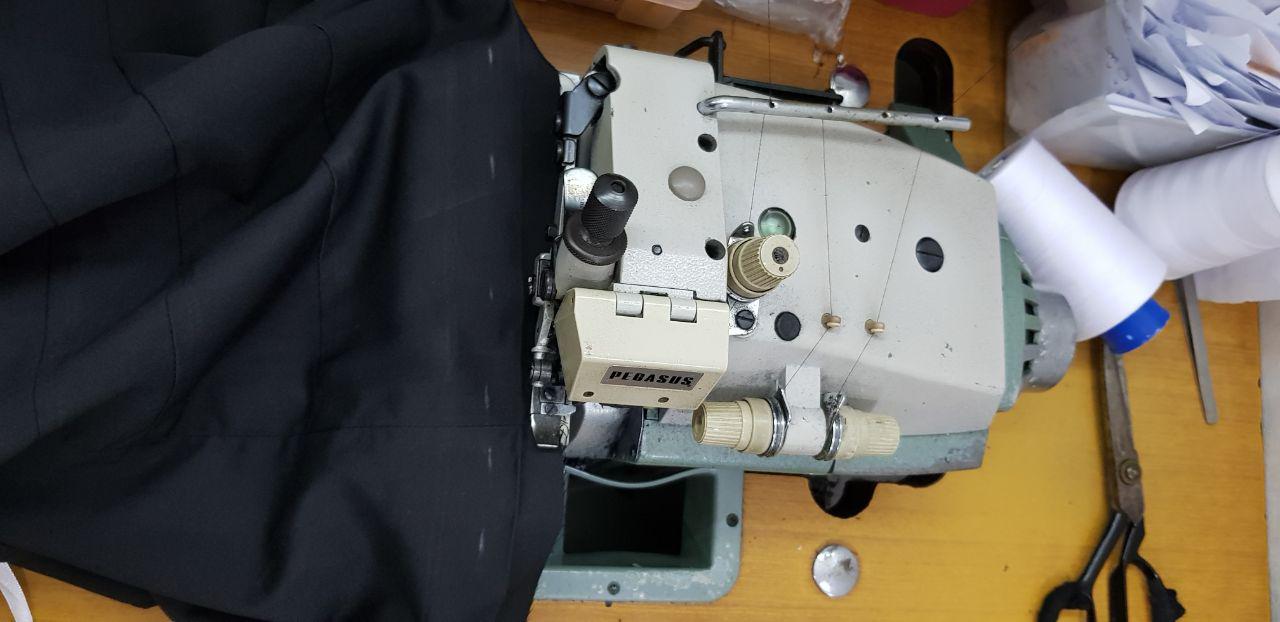
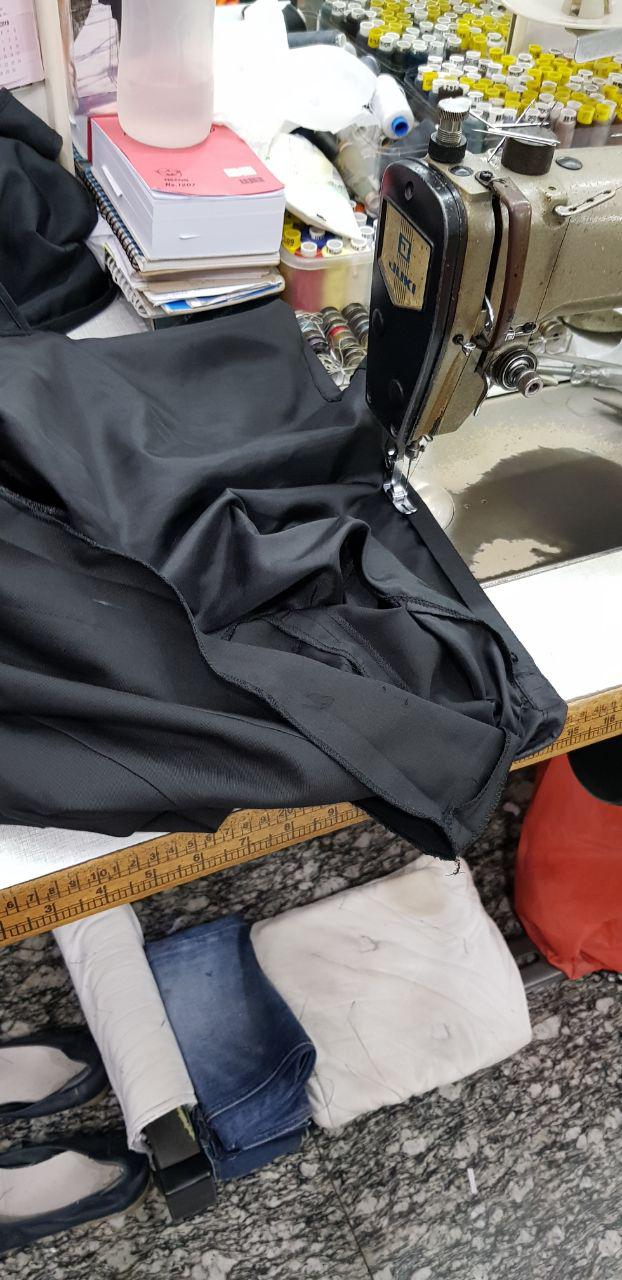
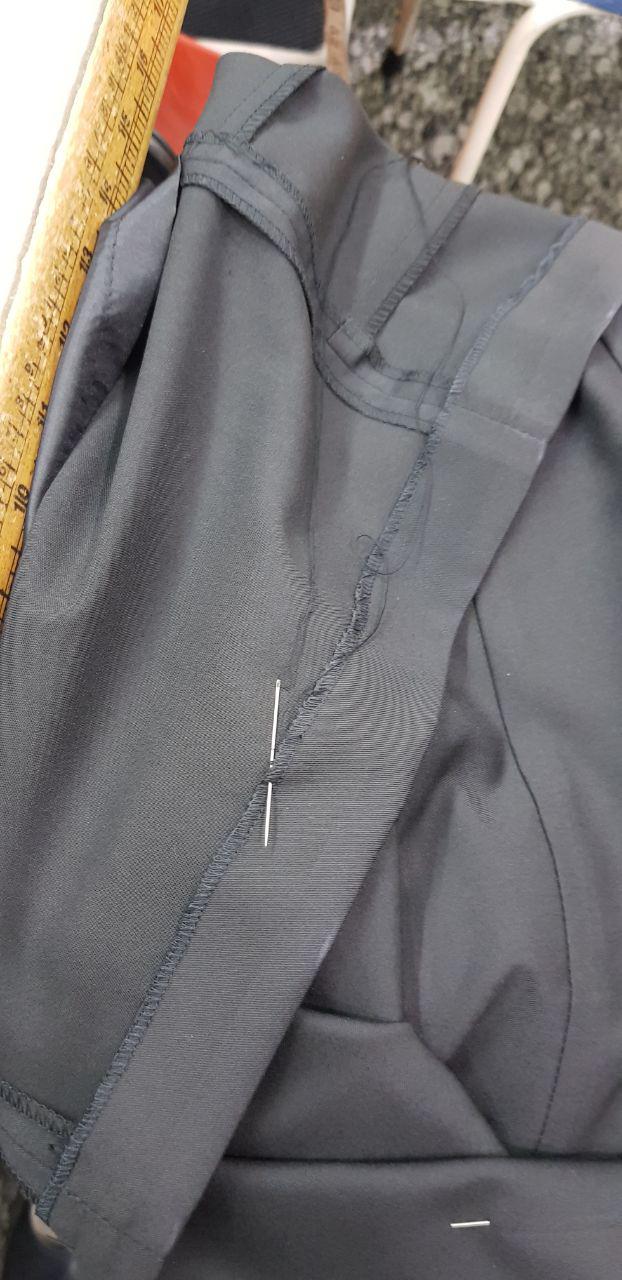
The tailor first measures the length that need to be cut away and altered with a measuring tape, as requested by the customer. Then, she marks the distance with a chalk. She then irons the skirt. After ironing, she cuts away the excess fabric from the garment with a scissors. Next she uses the overlock stitch on her sewing machine to serge the edge of the skirt. Next, she folds the end of the skirt to the new length and secure it with pins. The tailor then irons the new folding line for the skirt with an iron and after spraying water. She then blind stitches the hem. This is done by catching just 1 to 2 threads from the skirt material every time she brings the needle in and out of the hem. She continues blind stitching until the hem is sewn up. The altering process for the skirt is then complete.


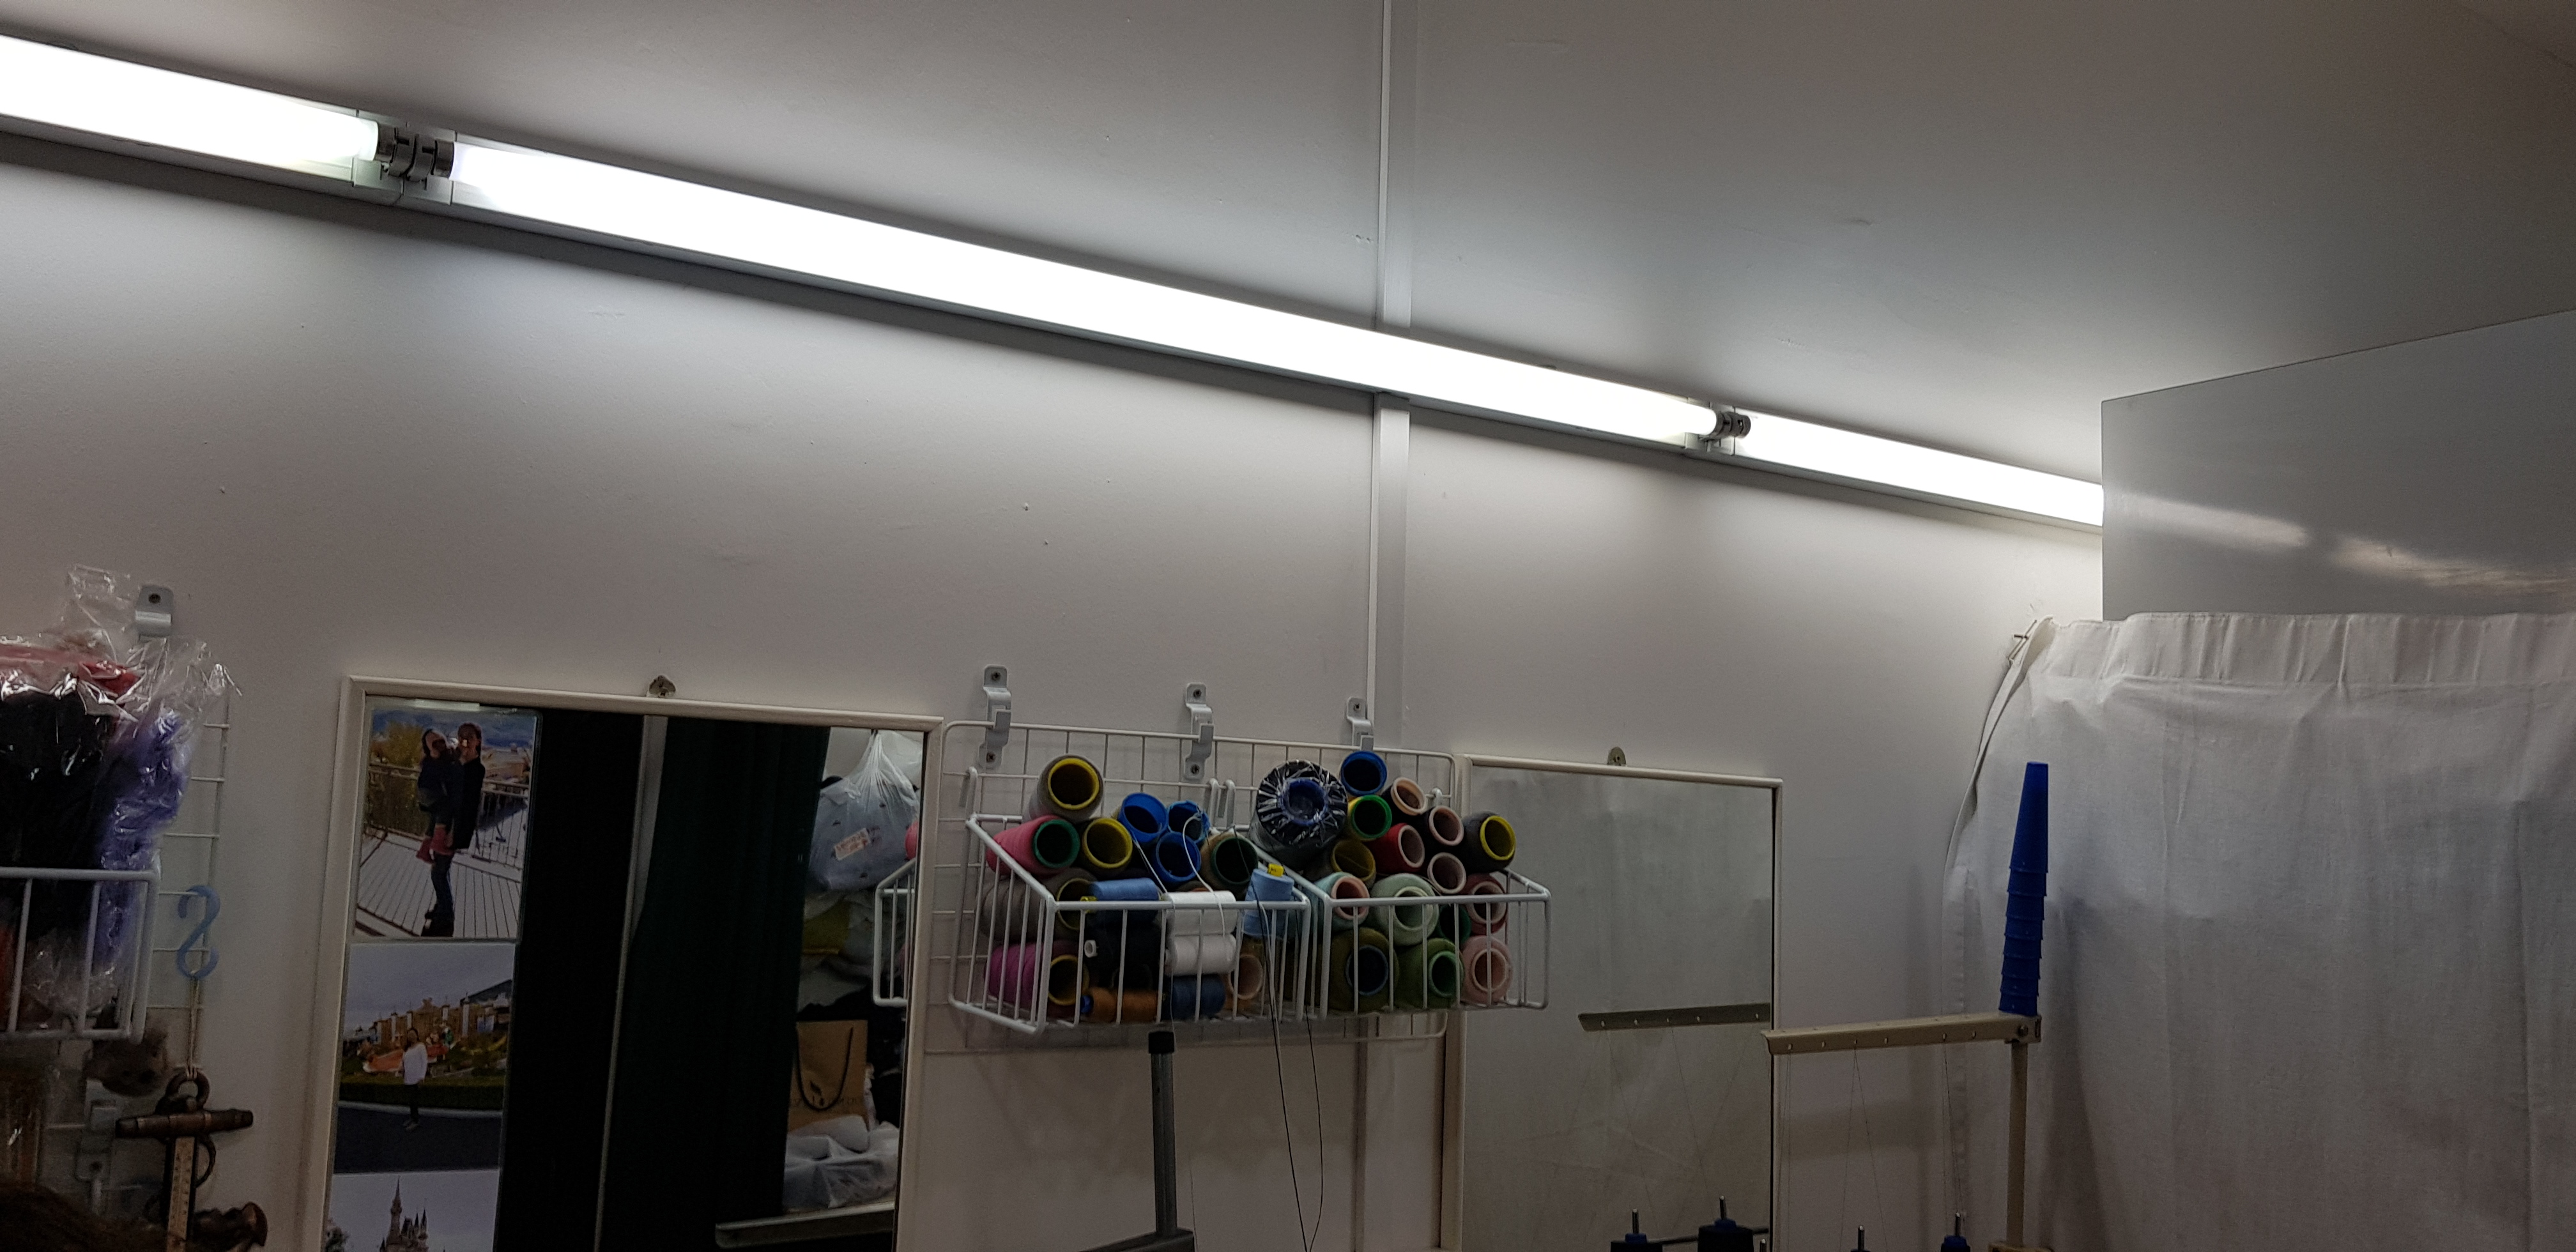
Workplace Documentation:
The workplace consist of mainly three working surfaces – a table where she measures the fabric, marks the fabric with chalk and cut it, another table where the sewing machine is at, and the ironing board. The ironing board is very close to the first table, which makes it convenient for her. The first table is sufficiently big enough for her to carry out her tasks. For the sewing machine table, I realise that there are fruits beside the machine, which I assume is her midday snack while she goes on with her sewing tasks. The mix of food and sewing machines make the area a little cluttered. Hence, I would suggest having a built-in cabinet or shelf on the wall to hold the food or snacks, to prevent clutter. The whole shop is also brightly lit with many lights and mirrors.
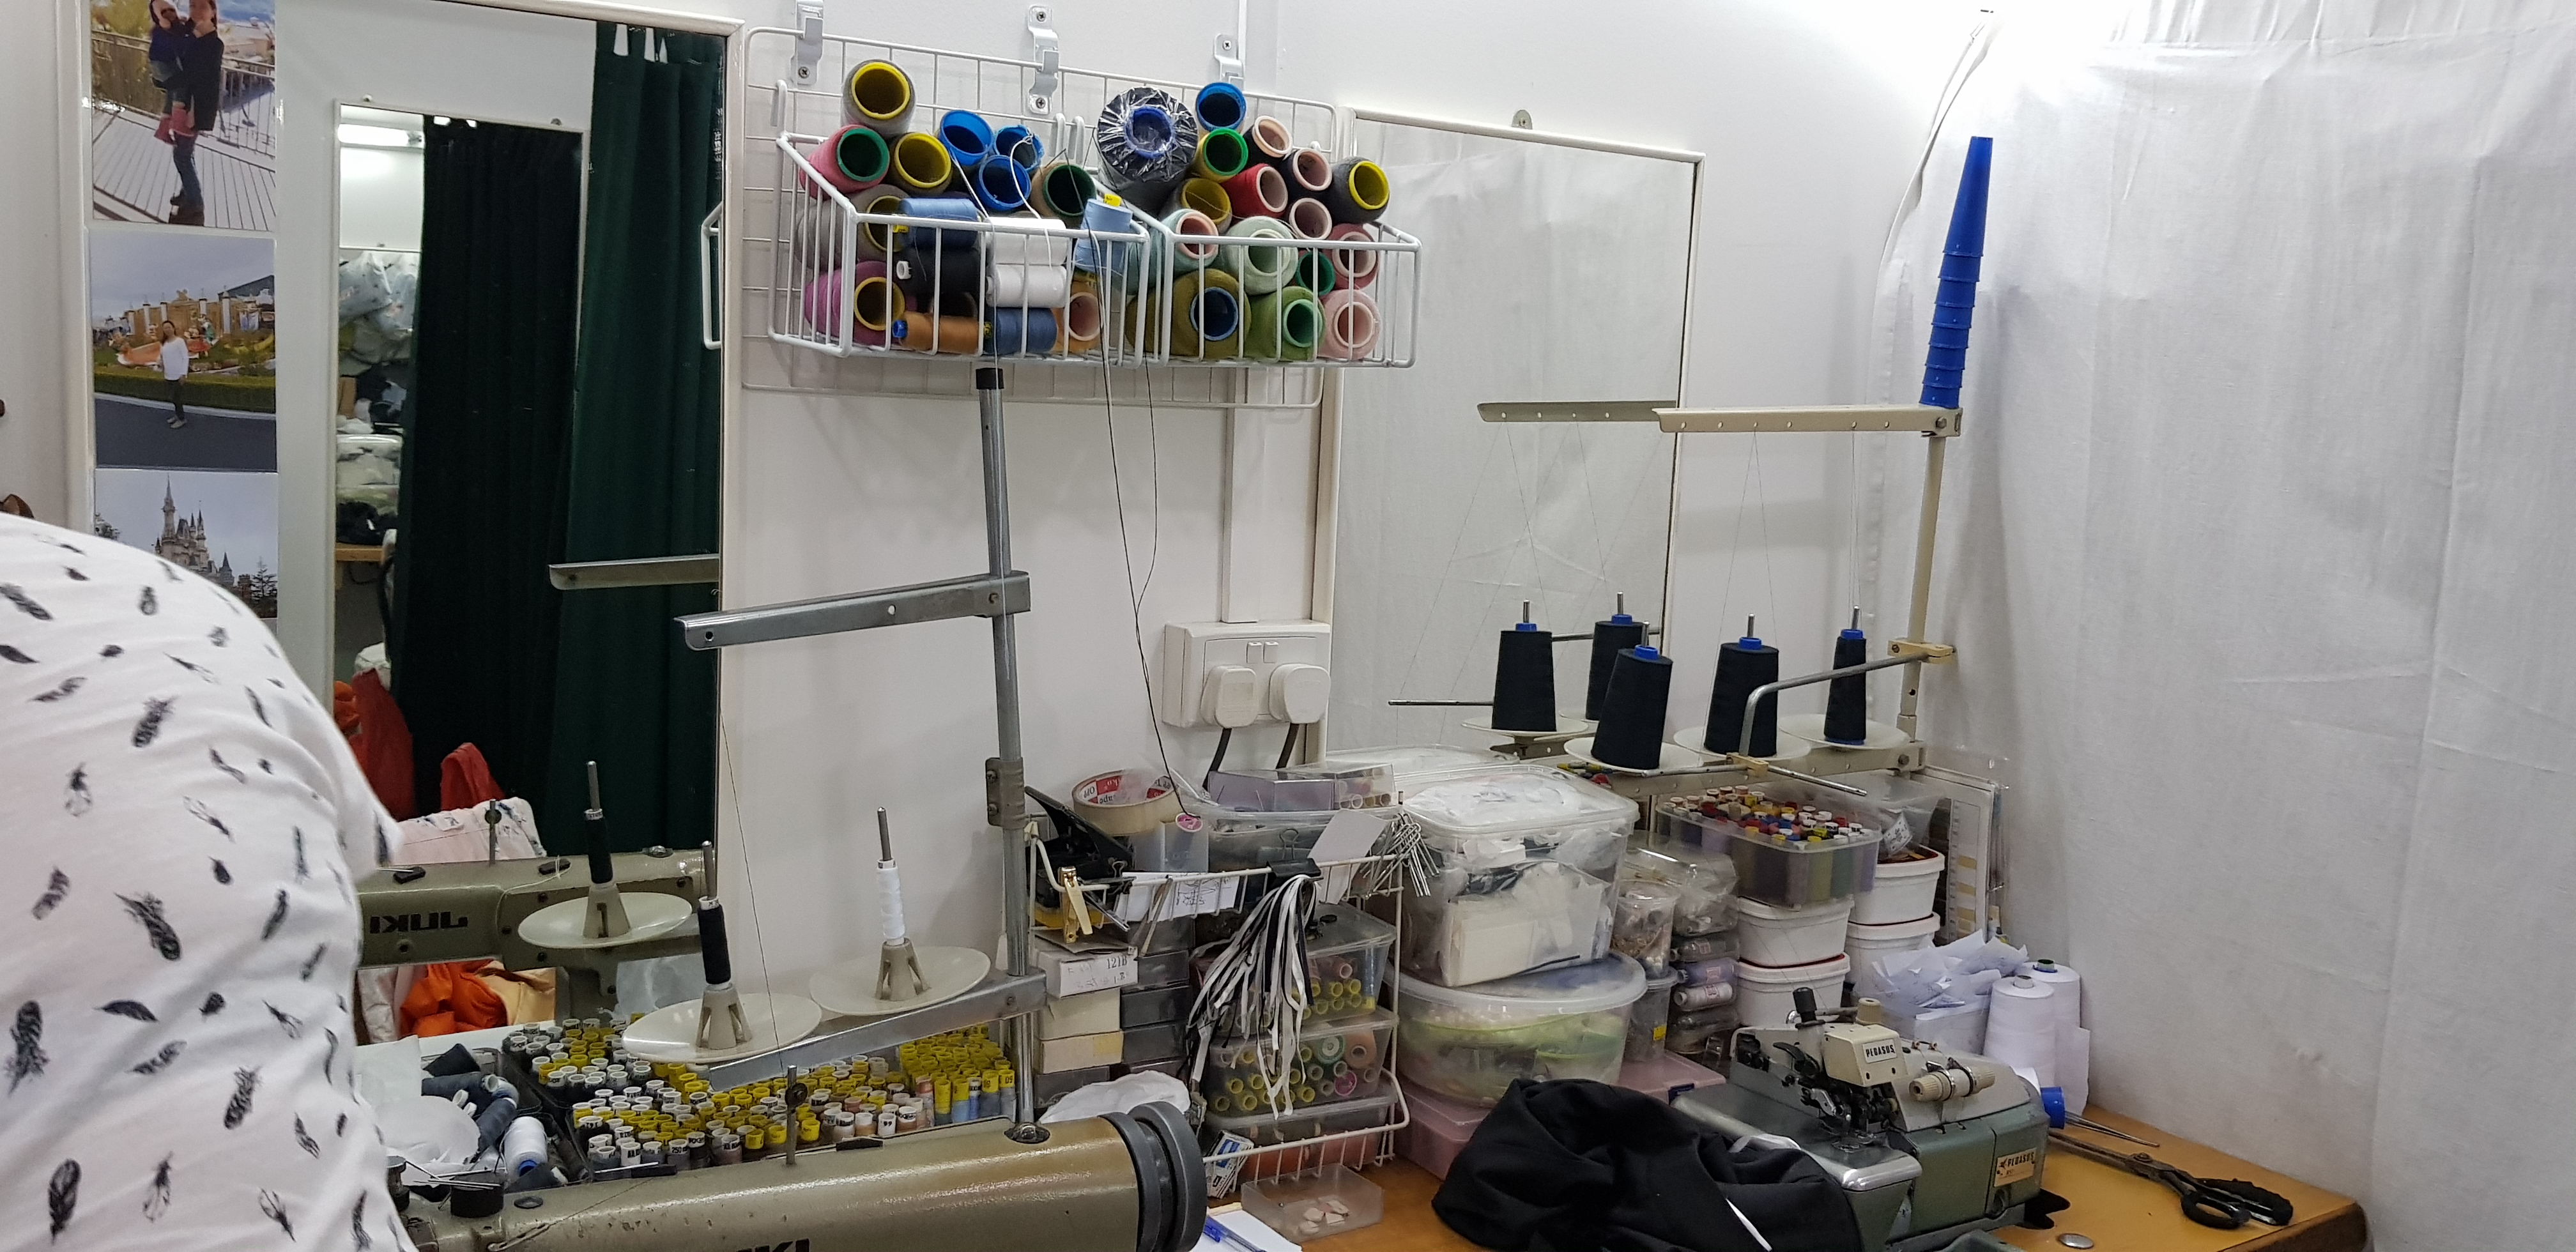
Tools:
Fabric scissors
Measure Tape
Needles
Pins and Pin cushions
Iron and water sprayer
Thimble and threader
Threads
Rulers
Sewing Machine
Seam ripper
Chalk
Pain Points:
Seeing how time-consuming the process of blind stitching by hand is, I asked the tailor why she does not want to buy a machine that can do blind stitching to save the time and effort. In response, she said that blind stitching by machine is not without its flaws as it is very easy to go wrong and if so, she would have to restart every time it happens. Hence, she prefers hand sewing the blind stitch.
She knows her struggles very well, and makes her sewing process as comfortable as possible. For instance, she told me that she places mirrors and many lights within her shop so that it will be brightly lit and would prevent her eyes from getting tired.
However, she talked about how she had many orders to finish every day, for example 3 pieces of clothing in a short span of 2 hours. As such, she also has many orders which she hangs on the wall of the shop, along with post-it notes stating the orders she had in the day. She labels the different bags of orders with masking tape. Hence, I feel that it can be rather messy and disorganised at times. It can perhaps be improved with a proper storage cabinet with cubicles and proper labels made with whiteboard material so that she can write with erasable markers and save on the masking tape. She could also use a touch function enabled screen to write down her orders and categorise them with colour coding and dates to improve from post-its which can be messy and easily lost in the mess.
Exploring Practitioners 3: Baking – Loke Ting Wei
Creative Practice: I approached a friend who loves to bake. Some of the things she bakes are lava cakes, pancakes, muffins, cupcakes and brownies.
Baking Process Documentation:
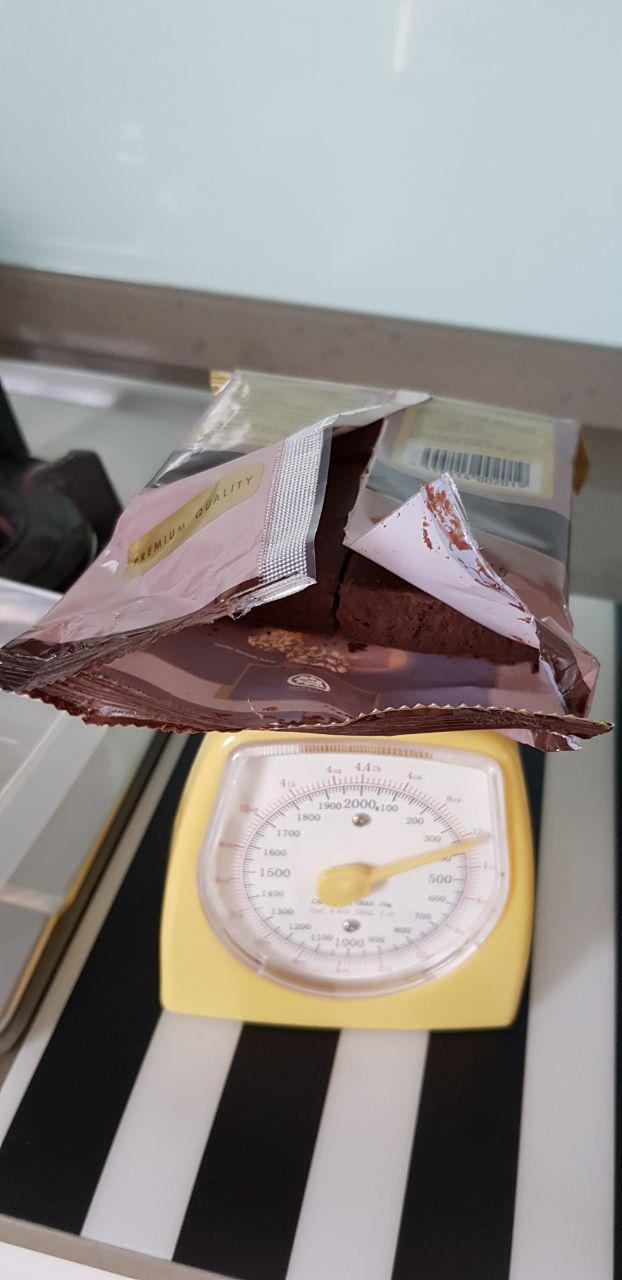
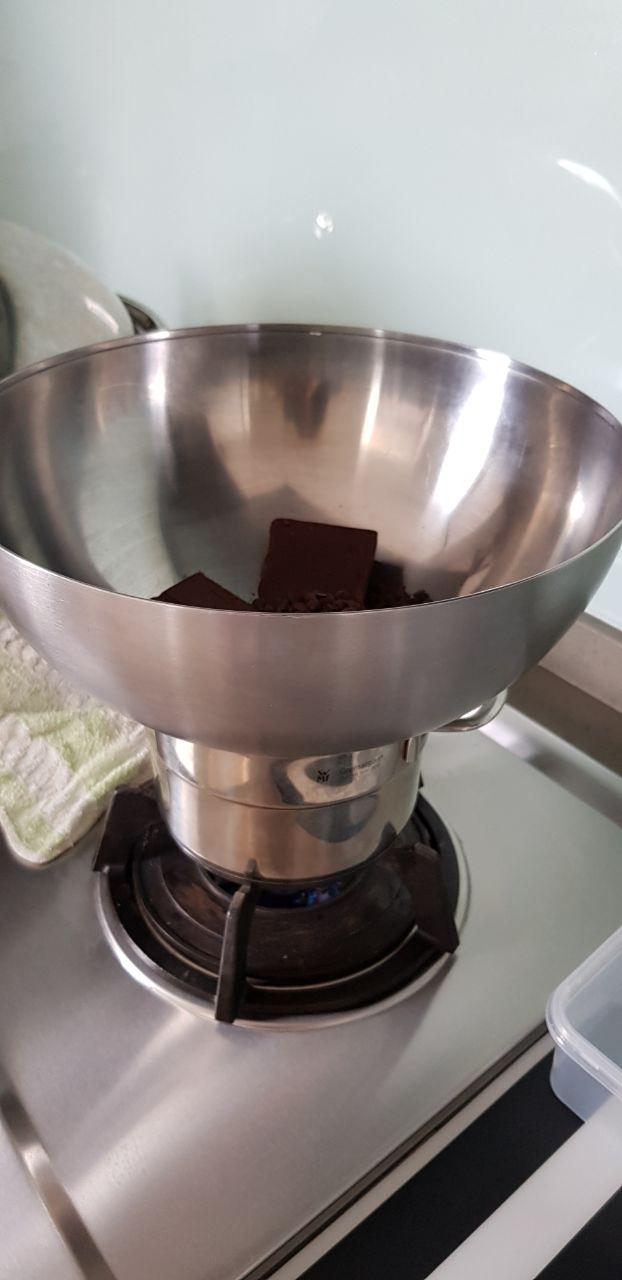
Firstly, she preheat the oven. Then, she measures the correct amount of chocolate, then melt it by double boiling it. While waiting for the chocolate to melt, she measures the correct amount of butter and sugar, and creams the butter and sugar. However, that day, she forgot to take out the butter from the fridge to soften beforehand. Hence, she had to spend more time cutting and smearing the butter and sugar in the mixing bowl to let it soften faster. As such, she did that first before proceeding to melt the chocolate midway.
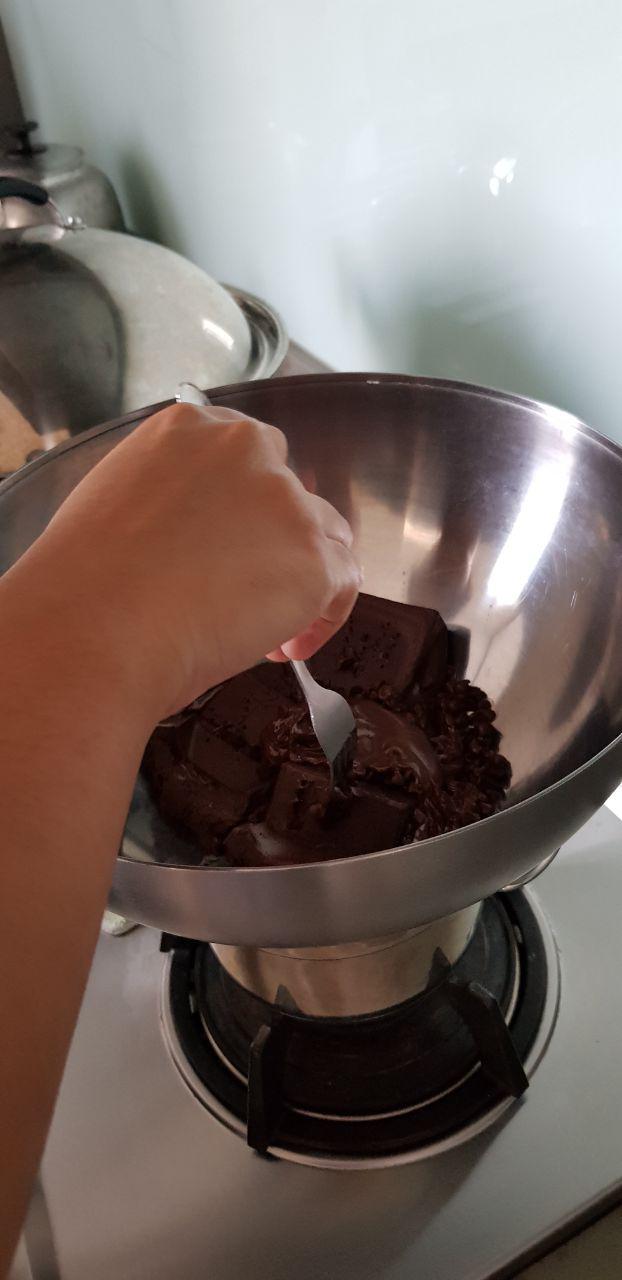
In addition, as she was too caught up with softening and creaming the butter and sugar, she was not looking at the chocolate melting. As a result, as there was no room for hot air in the pot below to escape, the temperature started getting too hot and the boiling water was bubbling and bordering the edge of the pot. Luckily, her family member who was in the kitchen told her. Forgetting that it was hot for a moment, she touched the melting bowl with her bare hands and almost got scalded. Then, I helped her lower down the fire.
After settling that and letting the chocolate to continue melt, she proceeded to resume with creaming the butter and sugar. She then added the eggs into it. In the process of breaking the eggs, she accidentally knocked too hard against the table and leaked a little of the egg white all over the floor. She then wiped it away.
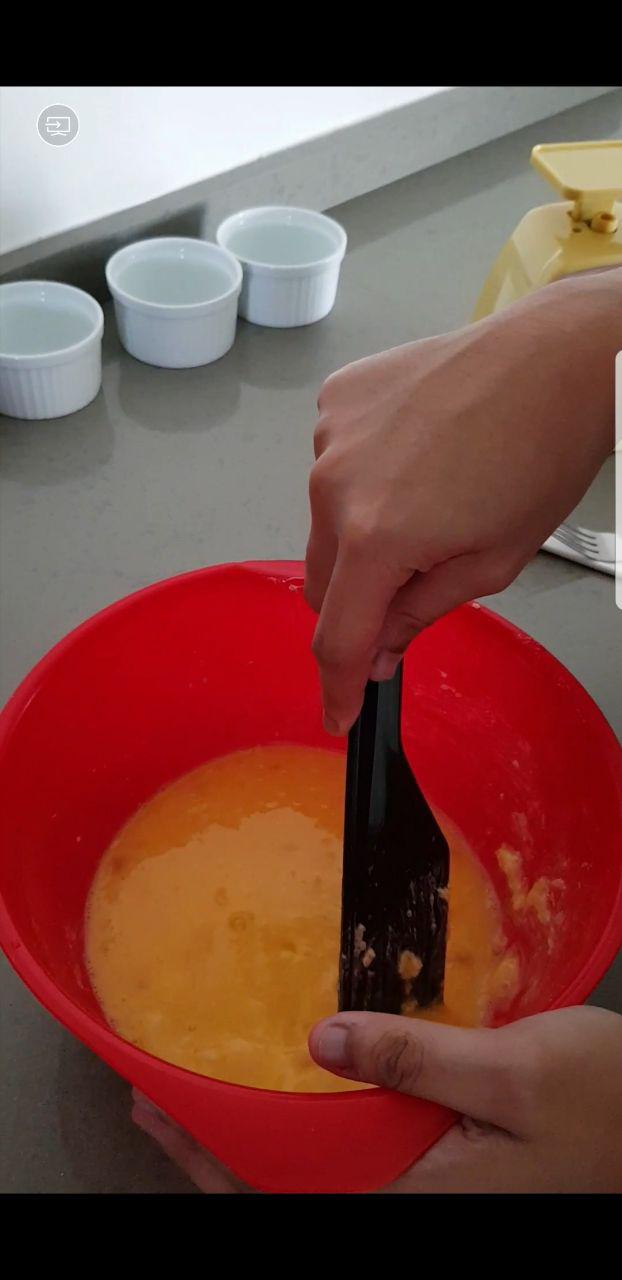
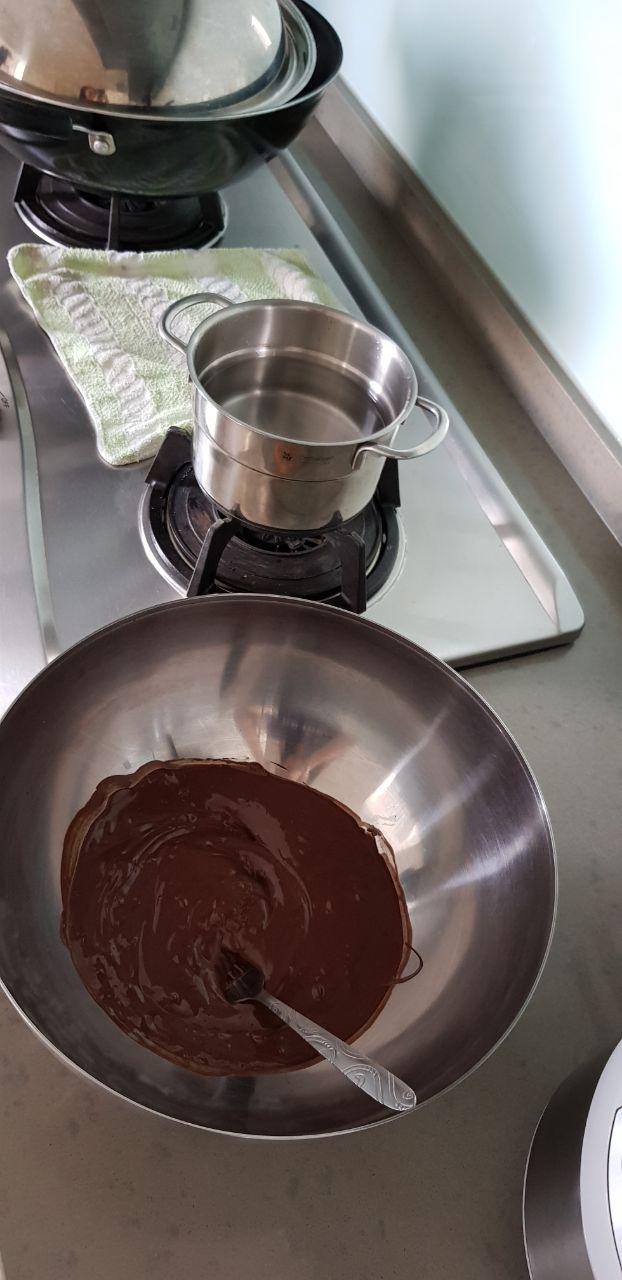
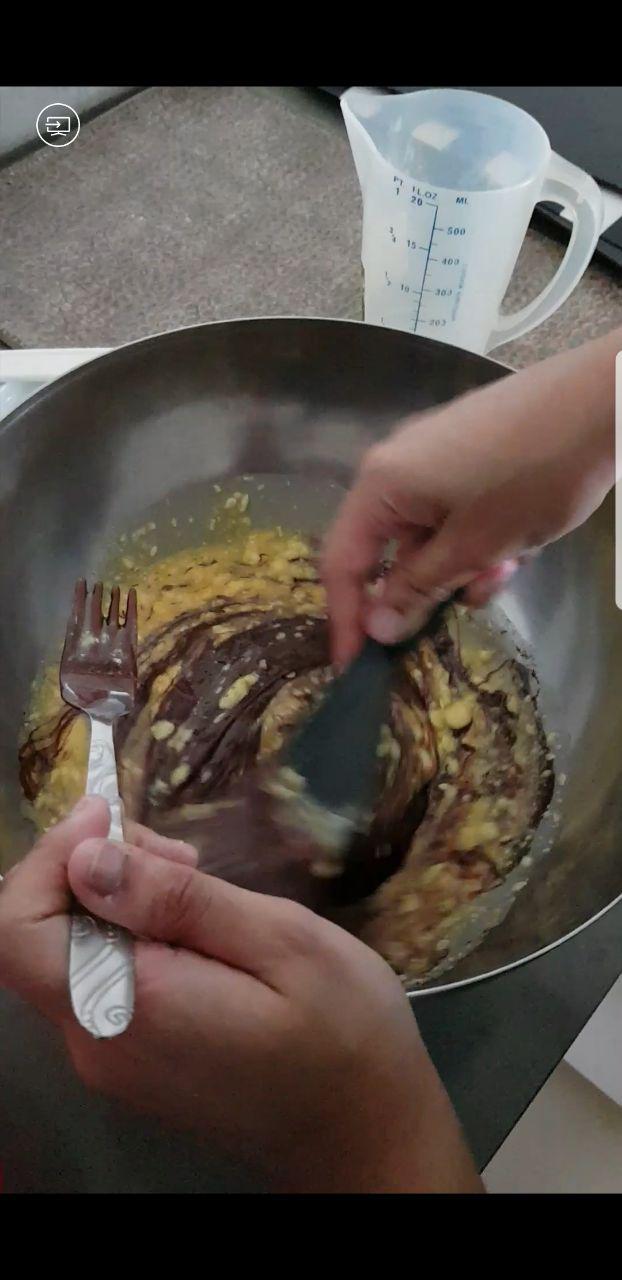
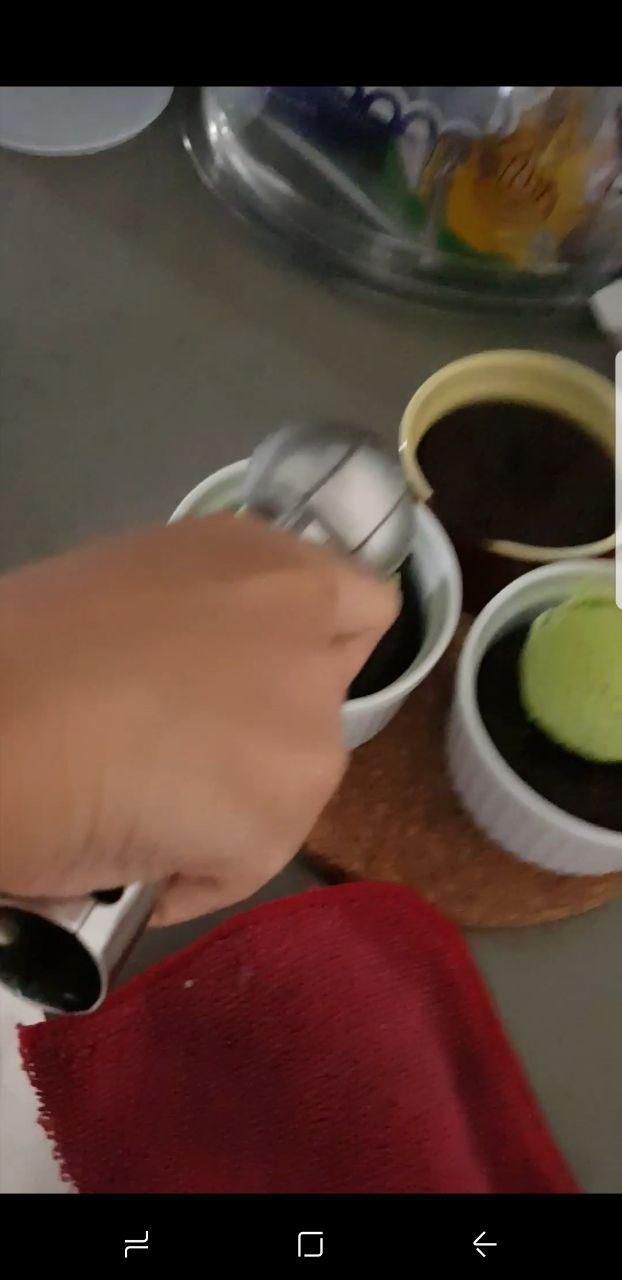
She then takes out the chocolate melting bowl away from the fire to cool when it is fully melted with clumps. Then, she returns to beating the mixture of eggs, butter and sugar with the spatula. Next, she proceeded to measure the flour on the weighing scale, and adds the flour and a pinch of salt into the mixture.
She then fold the chocolate into the mixture of flour, salt, butter and sugar. This is done by slowly pouring the chocolate, as we need to be careful not to cook the eggs with the heat from the chocolate. After ensuring that there are no clumps and the mixture is relatively smooth, she pours the mixture into the ramekins, and puts it in the oven to bake for 11 minutes.
Sequence of steps in pictures:


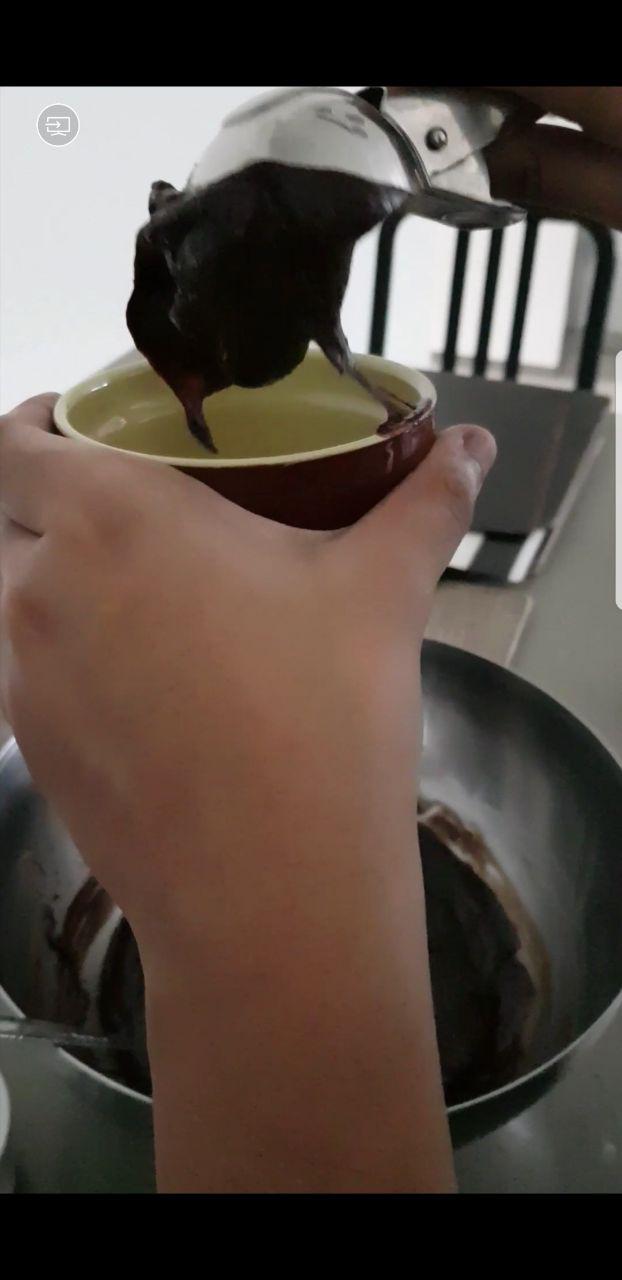
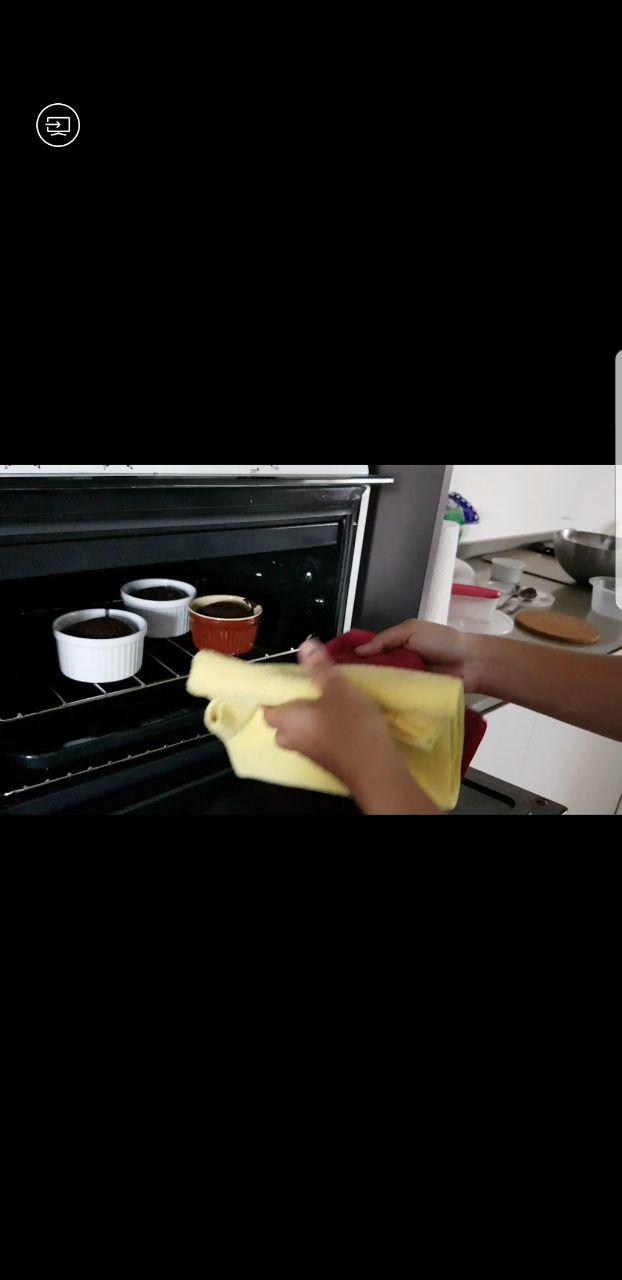
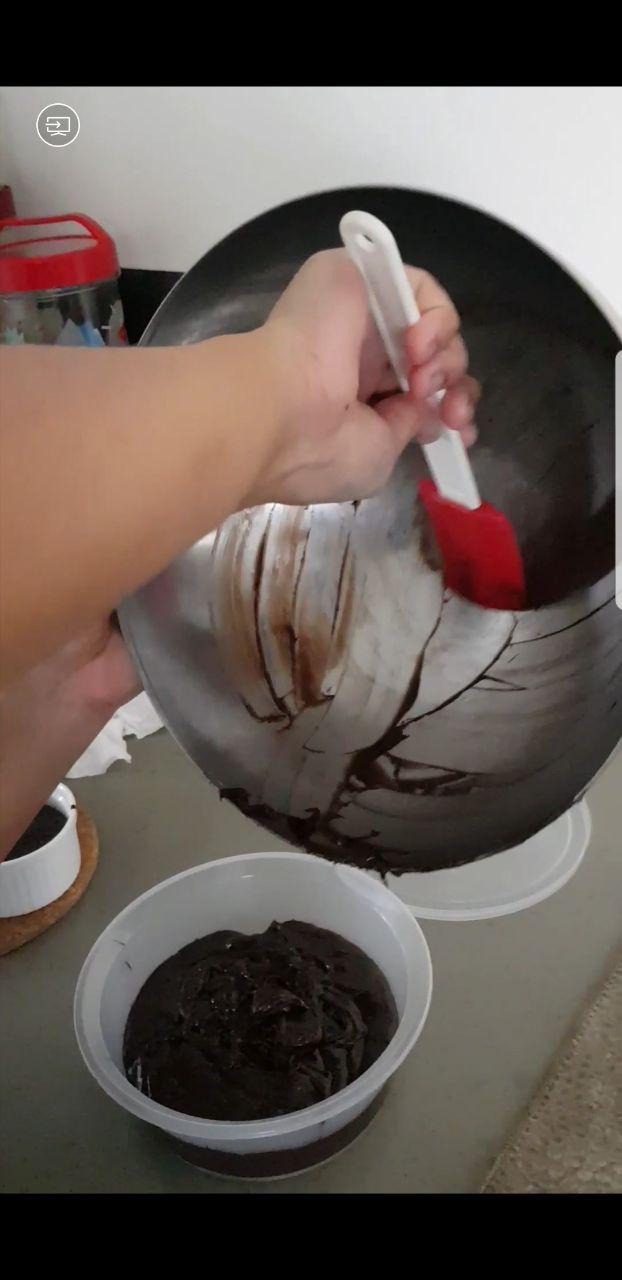
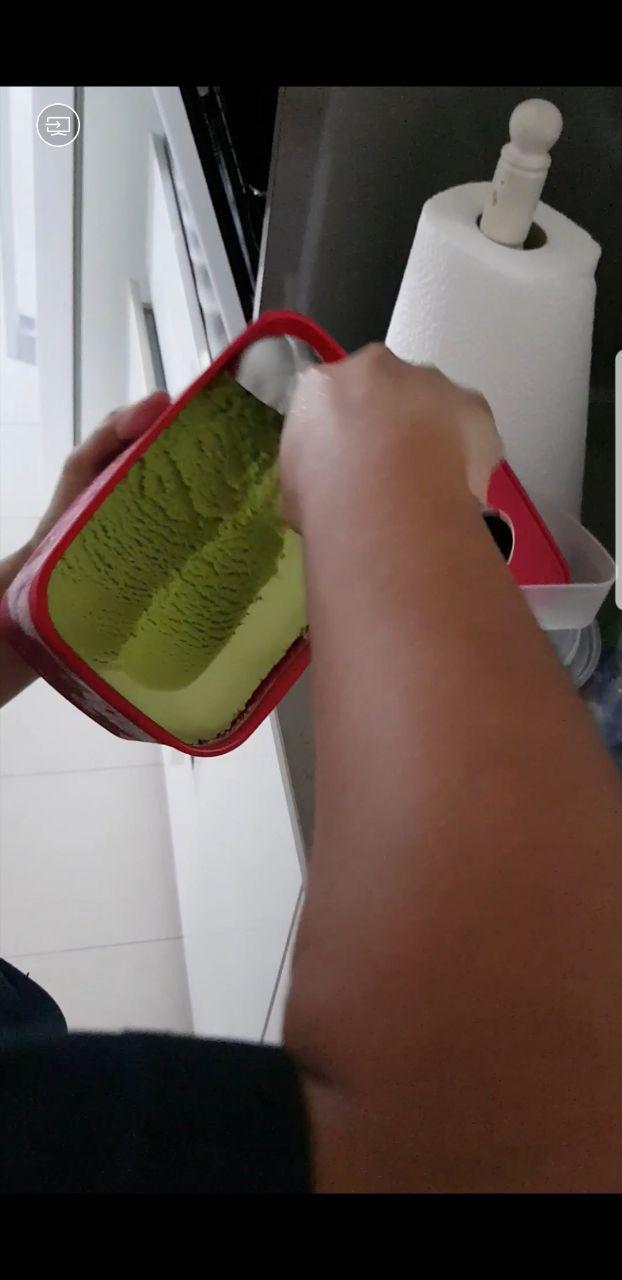
After that, she keeps the excess mixture into a disposable storage container for the next few bakes. After the lava cake is done, she takes it out of the oven and places a scoop of ice cream on top of it.
Workplace Documentation:
The workplace consists of 4 surfaces – the sink, the stove, the area beside the stove which she uses to weigh chocolate and beat eggs into the mixture, and another surface (bigger than the previous) which she uses to weigh flour, butter and to beat mixtures as well. When asked why she uses two different surfaces when she could have used one, especially when she detests creating a mess so much, she said she did not think too much.
At the stage of breaking the eggs into the mixture, she had to go to and fro from the table surface to the bin (which is around 5 steps away) to throw the egg shells, then back to the table surface, and finally after doing so 4 times for cracking 4 eggs, she goes to the sink to wash her hands. Hence, the inconvenience could be prevent if she had moved the bin nearer or throw the egg shells into a temporary bag.
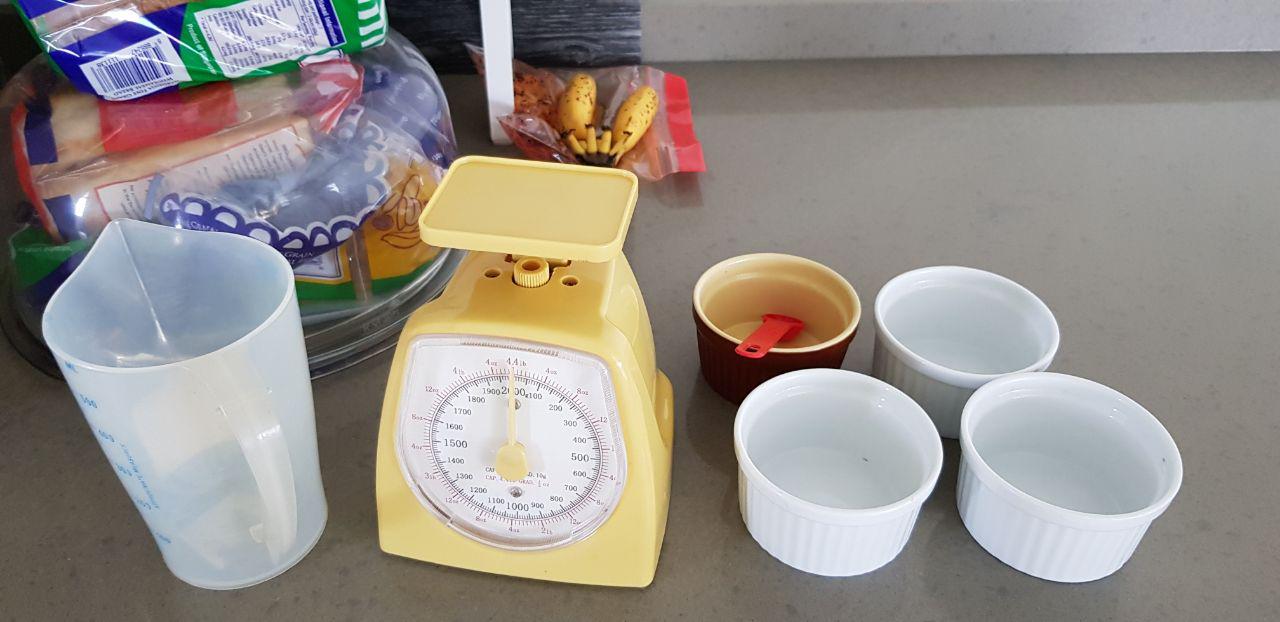
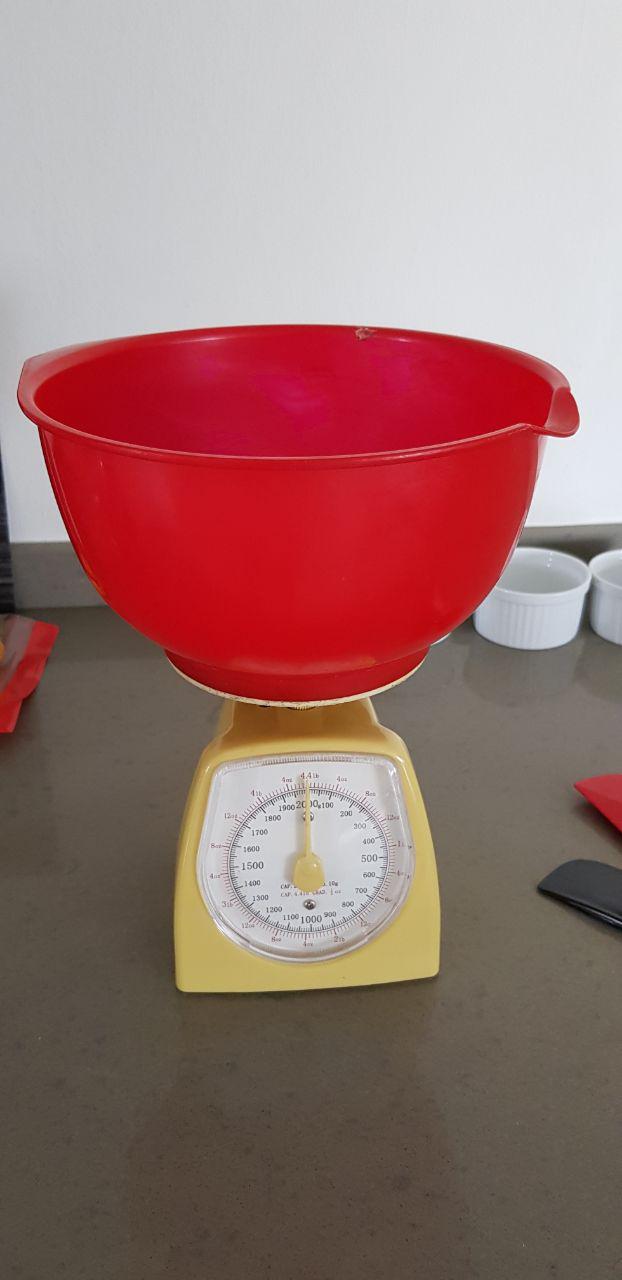
Tools:
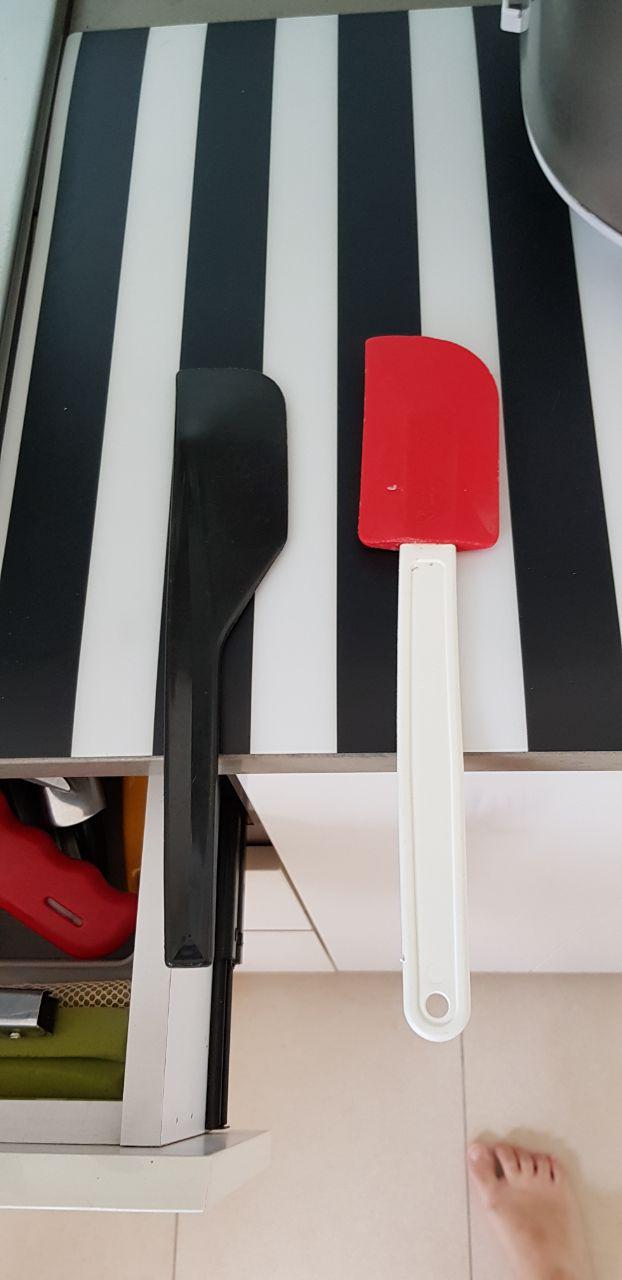
Spatula
Mixing bowl
Silicon spatula
Melting bowl
Pot
Weighing machine
Measuring cup
Ice cream scoop
Ramekins
Disposable storage box
Pain Points:
The pain points were that the area to work with were too small, plus the sink, bin and table top is far away from one another. As she likes to be clean and wash her hands after every step, for example she does not want to touch things with gooey egg-y hands, she has to walk to the sink every time, and go back to the working surface. Also, one of her main concerns were needing to wash the tools after use. Hence, it would be good if we can implement a self-cleaning device or tools for her. Because she does not want to wash the electric standing mixer, she does not use it; but said she would use it if it can self-clean somehow. Using the electric mixer would yield more satisfying results as the mixture would be less clumpy and smoother.
As she usually bakes alone, and there are two separate stations to look after (the stove and the table top where she mixes stuff), it is easy to neglect the stove and this can be dangerous, such as when the boiling water almost bubbles over, and when in a moment of forgetting it is hot, she almost got scalded by touching the melting bowl with her bare hands.
Hence, I would suggest having an app with a voice assistant that can track each step of the baking process, especially when many steps are ongoing at the same time. For example, the app will remind her to use a medium fire to heat up the chocolate at the start, and after 3 minutes, it will remind her to turn it down to a smaller fire, and after 10 mins, it will remind her to stir the chocolate and check if it is done. This can be good prompts when she is busy with creaming butter and sugar at another table surface which is a distance away. A temperature strip could also be stuck onto the melting bowl to remind her that it is hot so she does not lift it with her bare hands.
Cultural Probe: Design and Findings – Loke Ting Wei
I did a cultural probe with my friend who is a baker, along with two other friends who bakes cupcakes, muffins and lava cakes. I prepared a set of cultural probes to ask them, and by discussing with them and bouncing off ideas, we came up with solutions to target the problems experienced.
Contents + Rationale, Findings (which includes the problems faced) and proposed solutions:
Cultural Probe
Please record down:
- Process of making lava cake
Activities to do:
- Record down in your long every 5-minute periods (after every 5 minutes, what are the changes?)
- Process of making lava cake
- Struggles involved
Findings: Some of the practitioners did not follow the 5-minute periods, but instead record accordingly with each step, which is fine as well. From their steps and the struggles they wrote down, their feedback was that tools are all over the place in the kitchen, dirtying the surface of the table top and having to refer to the recipe on the phone repeatedly while hands are dirty.
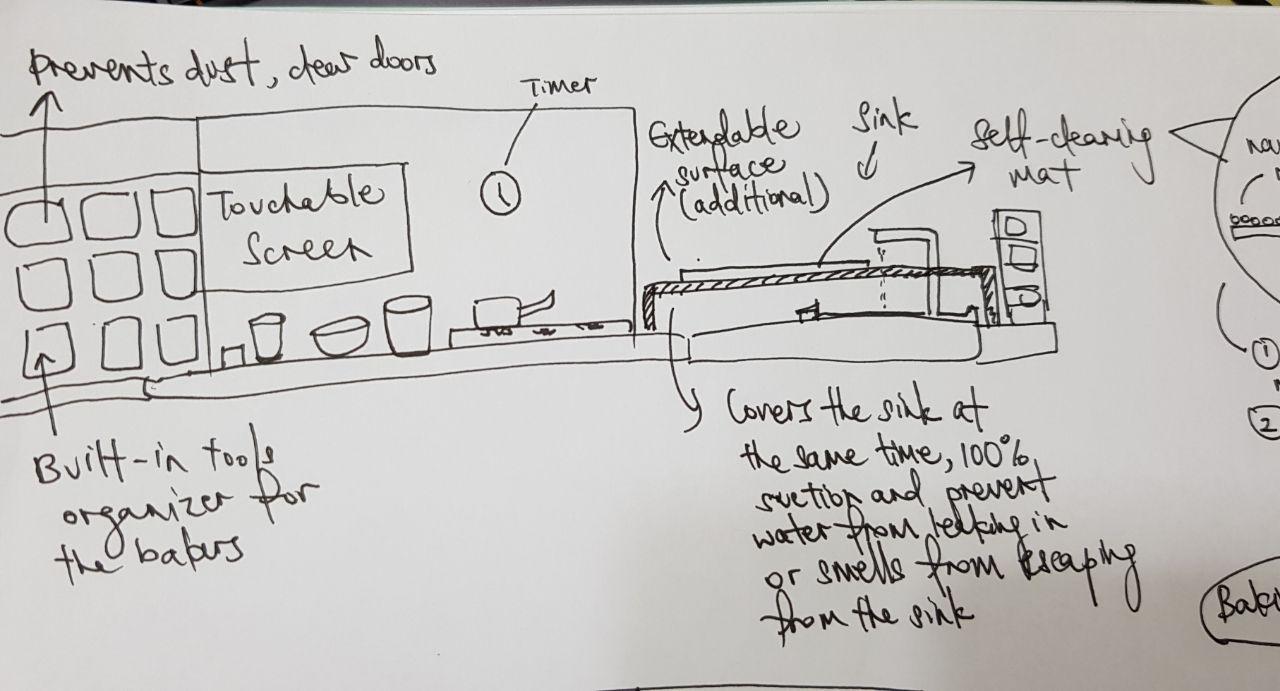
Suggestion: Touchable screen on the kitchen wall to record and display recipes. Space expansion with extendable surfaces, eg. that covers the sink and acts as an extra surface. Tools organiser in the kitchen cabinet, categorised according to uses. (eg. spatulas all together)
2. What are the:
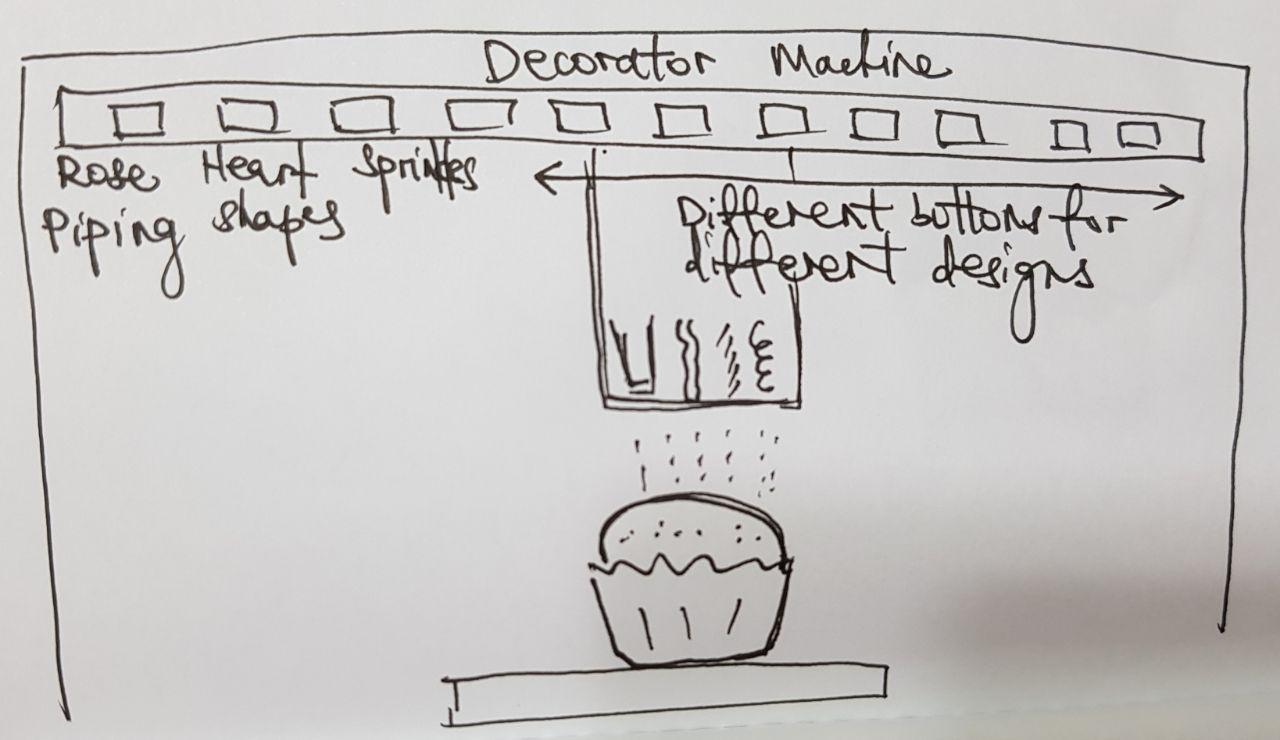
Findings: The practitioners said they would decorate the cake with more ingredients if they could afford more time and effort. Extra toppings include confectionary sugar, icing sugar, sugar heart shapes, m&ms, cookies and chocolate shavings.
Suggestion: A self-decorator machine that helps them to finish off the product with nice toppings. Upon the push of a button specifying the design, and keying the size of the cake, the machine would do it for them.
3. Circle the words you would want to incorporate into your lava cake
- Thai milk tea
- Green tea
- Heart shapes
- Yakult
- Yogurt
- Orange, apple, pear
- Peanuts, walnuts
- Jelly
- Sprinkles
- Bittersweet chocolate
- Carrot, beetroot
- M and Ms
- Gula Melaka
- Red Velvet mixture
- Cheese
- Avocado
- Salted caramel
- Cookie batter
- Oreo crumbs
- Now, how would you want to incorporate these into your lava cake? How is the baking process and tools used changed?
Findings: The practitioners chose the ingredients based on their own liking. For instance, one of them only likes chocolate and sweet stuff, not the fruits, while another loves fruits in her cakes. This question attempts to expand the creativity of the practitioner. One of them said she would like to add Thai milk tea in her cake. However, she has not found a way to do it. She would assume that she needs to add Thai milk tea into some sort of mixing agent for it to have the consistency of adequate thickness to make the cake batter.
Suggestion: Recipe app in which they can try adding different elements to the cake and see how the equation turns out.
4. Contextual changes that would take place
Findings: All of them wrote that it was almost impossible to skip steps as each step is important. The key is in remembering to do the preparation work beforehand to save time. Eg. take out the butter to soften.
Suggestion: Task organiser with notification alert. Or a timer that is stuck to the wall so avoid wasting space.
- If you would have to bake lava cakes for a competition, what additional steps would you take to improve your lava cake?
Findings: additional decoration, better quality ingredients.
- If you are making the cake for someone with diabetes, how would you change your ingredients and how would that affect your baking process?
Findings: lessen the sugar, change normal chocolate to dark chocolate, add more fruits, use fruit juices and natural sweetness to replace sugar.
Suggestion: A sugar level indicator. This is rather futuristic as the available solutions now is to use Benedict’s solution to test for simple sugars, such as glucose. It is a clear blue solution of sodium and copper salts. In the presence of simple sugars, the blue solution changes color to green, yellow, and brick-red, depending on the amount of sugar. However, this solution is unable to test for sucrose, which is commonly used in baking. Furthermore, using chemicals while preparing food is dangerous. Hence, perhaps the only way is to test the sugar level through tasting and trial and error each time. The practitioners can record down the level of sweetness along with the amount of sugar used each time and place it on the kitchen wall. A touchable screen on the wall would be even more convenient.
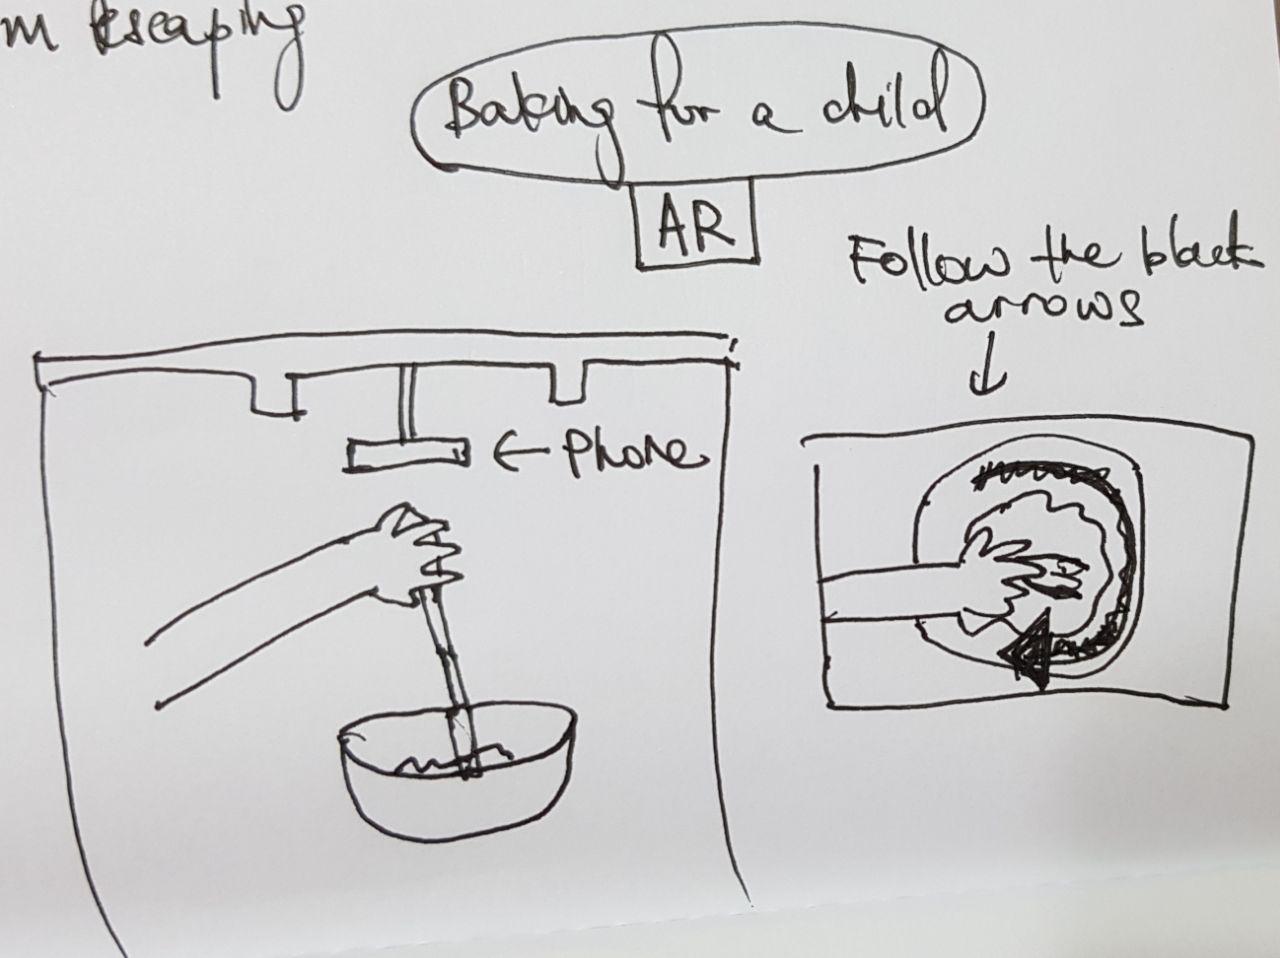
- If you have to make it for a child, how would you have done it differently and how does that affect your baking process and tools used?
Findings: add more decorative and colourful toppings for the child
- If you have to teach the child how to bake, how would you have done it?
Findings: explain more and guide the child step by step, holding his or her hand if necessary.
Suggestion: Augmented reality with a phone camera on top of the child’s hands and bowl. The child would have to follow the markings on the screen to achieve the correct results.
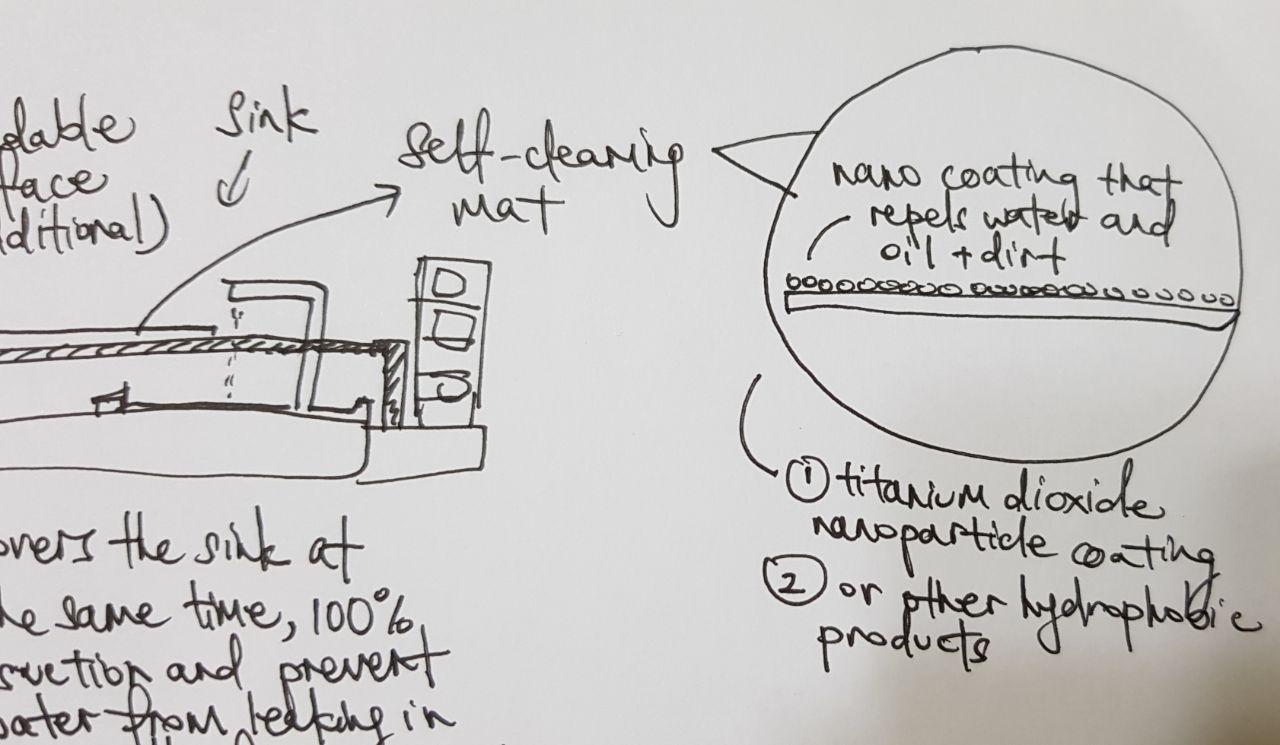
- If you have to keep the kitchen surfaces with no dirt or spillage at all, how would you have done it? (eg. with newspaper or mat?)
Findings: plastic sheets would be good, although not environmental friendly
Suggestion: self-cleaning mat made of nano coating that repels water, oil and dirt. Eg. titanium dioxide nanoparticle coating or other hydrophobic products
- Games:
- Cut the butter (2 slices) as fast as you can. What is your record breaking score? (I will record)
Findings: With the rush for time, they realise that the ways they handle this process may not be the most efficient. One of them realise that their butter was too soft and sticks to the knife. Another one did not soften the butter beforehand and hence took more effort and time to cut them with a spatula. The other one had a proper surface with softened butter and cut the butter the fastest.
- Pour the flour in the mixture without any spillage.
Findings: Accidental spillages often happen.
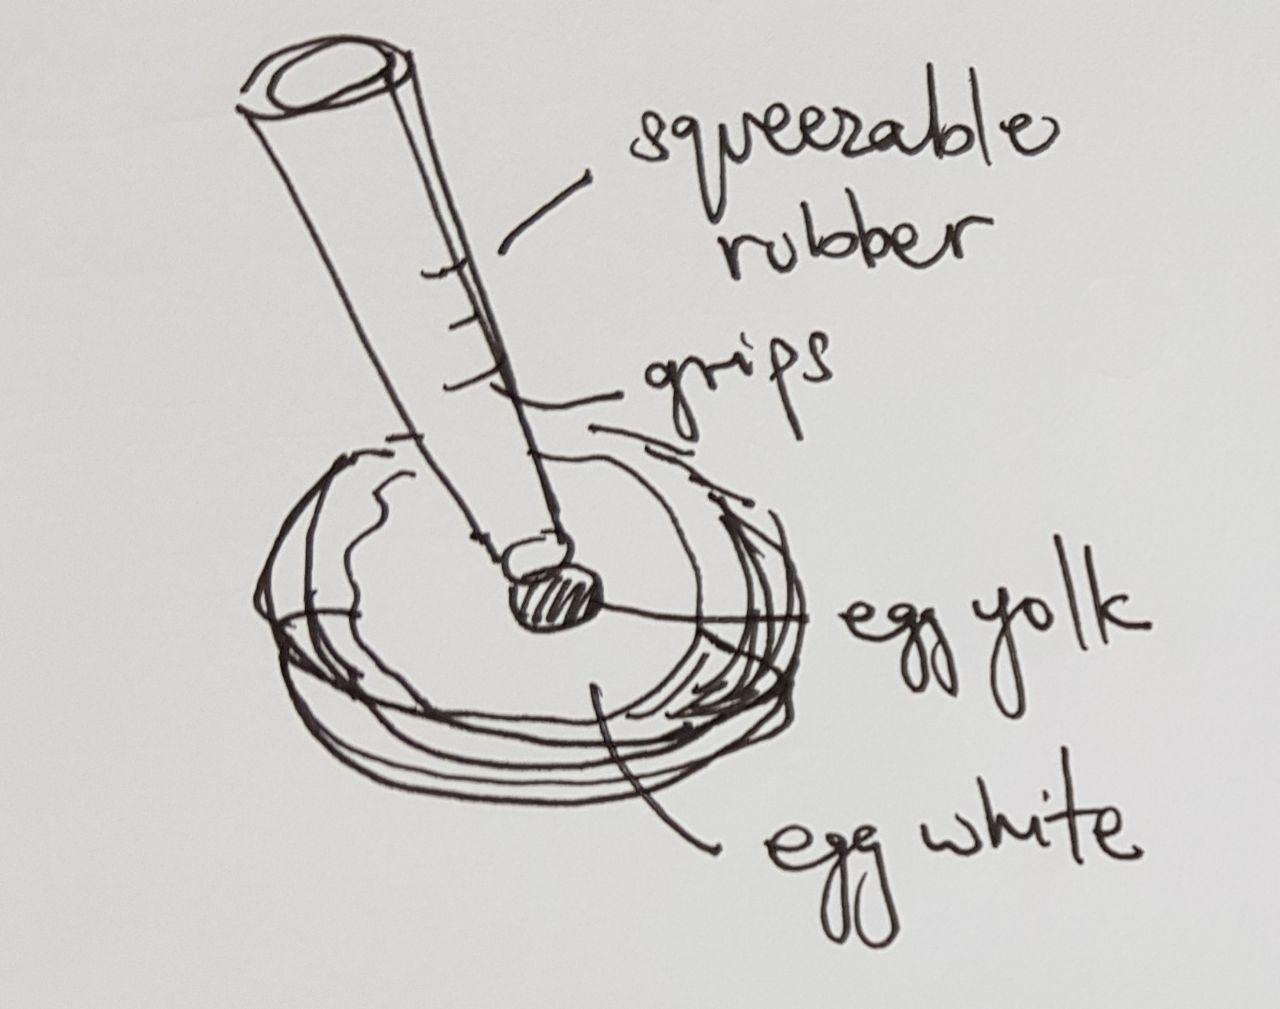
- Separate the egg yolk from the white as fast as you can.
Findings: Most do not do this due to the hassle.
Suggestion: Suck the egg yolk out from the egg white using a suction bottle.
- Scoop the batter into the ramekins as fast as possible.
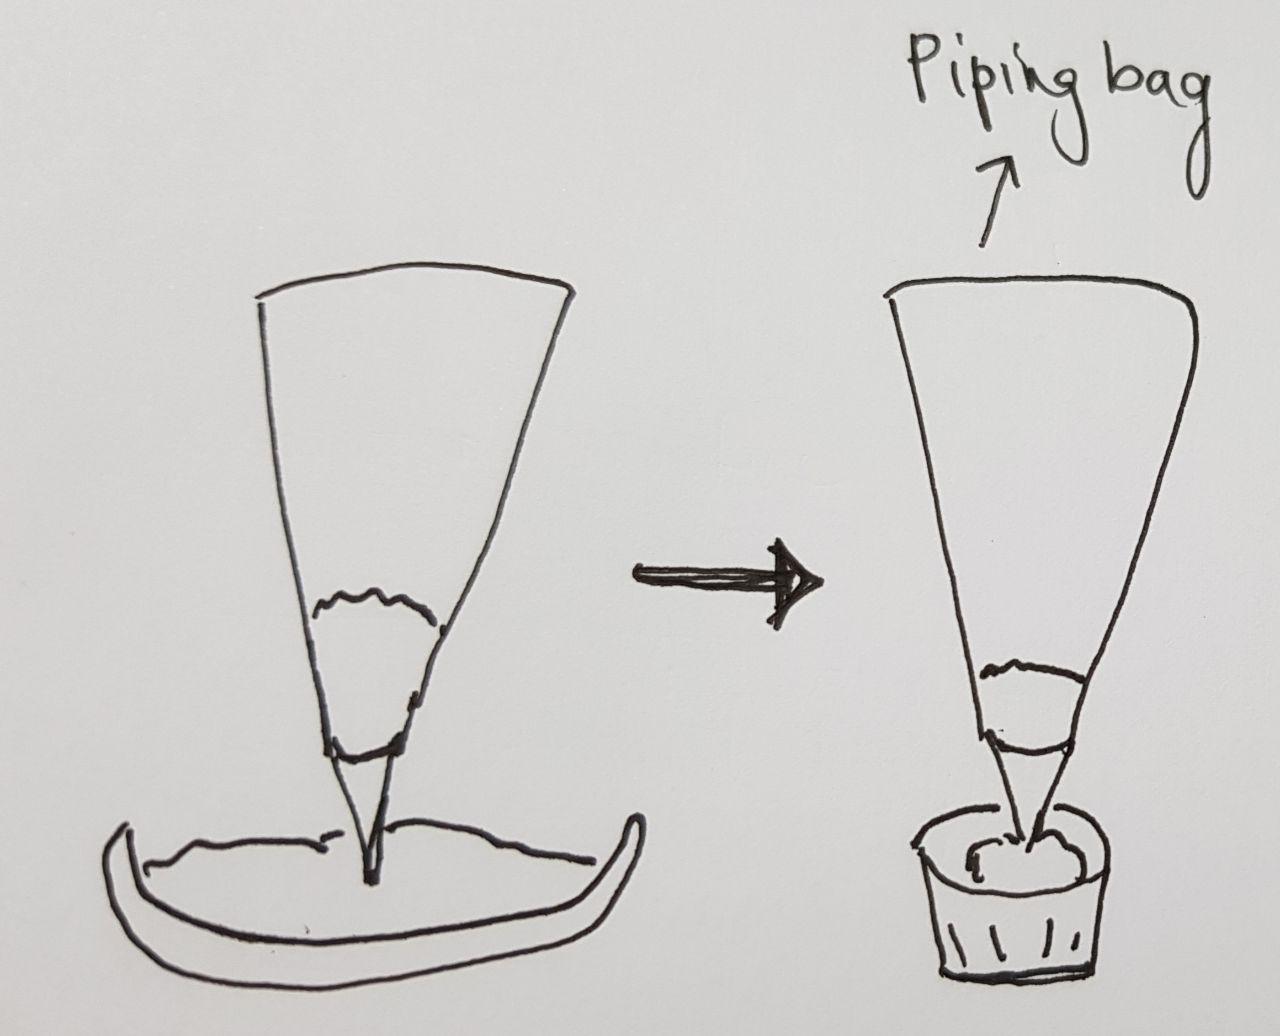
Findings: One uses an ice cream scoop, the other two uses spoons. They find it troublesome to accurately place it in the tins or ramekins without dripping over the edge. Using a scoop will also cause wastage as it is difficult to scoop out the excess.
Suggestion: A piping bag to suck up the batter and place it accurately into the tin or ramekin.